<?xml version="1.0" encoding="utf-8"?>
<feed xmlns="http://www.w3.org/2005/Atom">
  <title><![CDATA[Dmitry Fink]]></title>
  
  <link href="/atom.xml" rel="self"/>
  <link href="http://finik.net/"/>
  <updated>2019-01-10T06:56:32.721Z</updated>
  <id>http://finik.net/</id>
  
  <author>
    <name><![CDATA[Dmitry Fink]]></name>
    
  </author>
  
  <generator uri="http://zespia.tw/hexo/">Hexo</generator>
  
  <entry>
    <title><![CDATA[Tokamak Puzzle]]></title>
    <link href="http://finik.net/2019/01/09/Tokamak-Puzzle/"/>
    <id>http://finik.net/2019/01/09/Tokamak-Puzzle/</id>
    <published>2019-01-10T05:49:43.000Z</published>
    <updated>2019-01-10T06:55:40.627Z</updated>
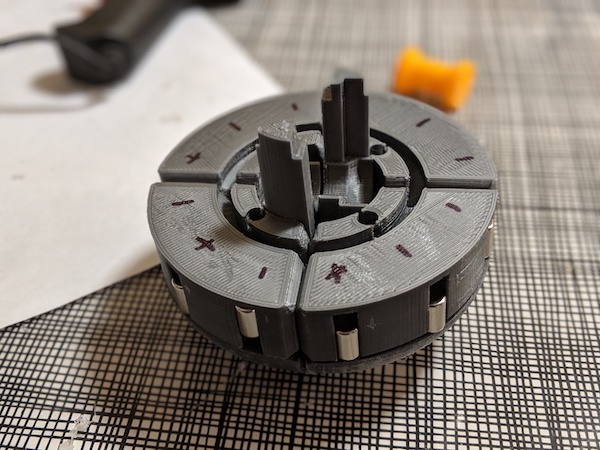
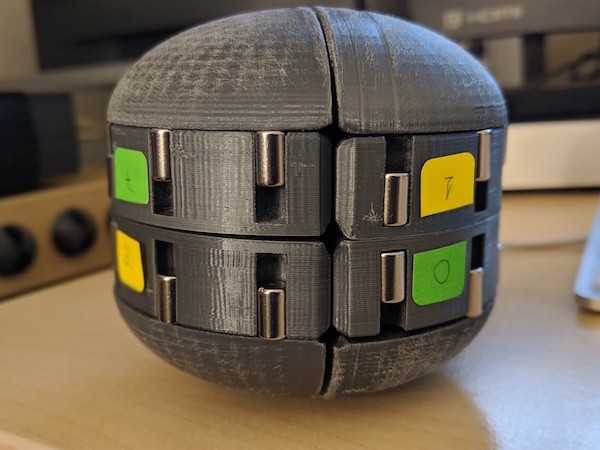
    <content type="html"><![CDATA[<p>Oscar Van Devender did a varation of the Auzzle Puzzle and called it <a href="https://i.materialise.com/en/shop/item/tokamak" target="_blank" rel="external">Tokamak</a>:</p>
<iframe width="560" height="315" src="https://www.youtube.com/embed/xyj9uF6YkdE" frameborder="0" allow="accelerometer; autoplay; encrypted-media; gyroscope; picture-in-picture" allowfullscreen></iframe>

<p>Among the improvents Oscar mentions the following:</p>
<ol>
<li><p>The eight segments were given eight different colors. The segments were rather hard to keep track of in the original version.</p>
</li>
<li><p>The magnets were placed such that the puzzle can only be solved when the top four segments are offset from the bottom ones.</p>
</li>
</ol>
<p>While I like the shape and the looks of the colored Tokamak, and I would love to get the STL files to print one for myself (I find the original Auzzle too big for my hands), I have to admit I disagree with Oscar on both points:</p>
<ol>
<li><p>Not being able to easily identify segments at rest is the whole idea! When segments are colored or marked in any way, it stops being a magnetic puzzle. Magnets start to act merely as a decoration, they are not longer vital for a solution. The puzzle is reduced to a 2x2x2 cube with a few movemenet constraints, which is still trivial for any twisty puzzle enthusiast.</p>
</li>
<li><p>Even in the non colored version, introduction of a shift between upper and lower layer does not add, but possibly (depending on an assembly process) reduces puzzle complexity even more. Here is a logical proof (you might need to refer my original <a href="/2018/12/24/Auzzle-Puzzle">Auzzle Analysis</a> for some context):</p>
<p> a) Lets assume that the way Tokamak is assembled, all 8 segments happend to still be unique (i.e all numbers from 0 to 7 are being represented: 000, 001, 010 .. 111). By definition then, that puzzle has also 96 non-shifted solutions in which segments are aligned, as described in my original analysis. So the shift during assembly was pretty much a useless gesture.</p>
<p> b) To avoid that, we must ensure during assembly that segments are NOT unique and some encodings are not being represented. That means two or more segments must share the same binary encoding, as we still have 8 segments. That in turn means these identical segments can swap places and the puzzle would remain solved (all magnets would still attract). So total number of unique combinations is decreased by a factor of K! while the number of solutions increases by a factor of K! (where K is number of pieces sharing the same encoding).</p>
</li>
</ol>
]]></content>
    <summary type="html">
    <![CDATA[<p>Oscar Van Devender did a varation of the Auzzle Puzzle and called it <a href="https://i.materialise.com/en/shop/item/tokamak" target="_bl]]>
    </summary>
    
      <category term="puzzles, hobby" scheme="http://finik.net/tags/puzzles-hobby/"/>
    
  </entry>
  
  <entry>
    <title><![CDATA[Auzzle Solution]]></title>
    <link href="http://finik.net/2018/12/30/Auzzle-Solution/"/>
    <id>http://finik.net/2018/12/30/Auzzle-Solution/</id>
    <published>2018-12-31T07:45:24.000Z</published>
    <updated>2018-12-31T22:01:57.748Z</updated>
    <content type="html"><![CDATA[<p>In this post I continue the analysis of Auzzle, the magnetic puzzle invented by Ilya Osipov and attempt to come up with a simple to remember solution involving only one algorithm. See my <a href="/2018/12/24/Auzzle-Puzzle/">first</a> post for the background and initial analysis.</p>
<p>After practically living for three days at my friend’s house and learning more than I ever wanted to know about 3d printing, I’ve finally got myself an Auzzle to play with. The picture below shows the assembly process:</p>
<p><img src="/images/auzzle/3dprinthalf.jpg" alt=""></p>
<h2 id="The_goal">The goal</h2>
<p>There are four pairs, or 8 pieces total in the puzzle. The goal is to move them around until we get to one of the combinations (there are multiple) where each pair is aligned vertically. In the picture below, piece #1 should be matched with #3 and #0 with #7, so swapping two pieces either on the top layer or the bottom one would solve both pairs. Obviously on a real Auzzle the pieces are not marked with colors or stickers, so our solution should not assume that, instead we need to deduce it just by looking at the magnets formations.</p>
<p><img src="/images/auzzle/3dprint.jpg" alt=""></p>
<h2 id="Notation">Notation</h2>
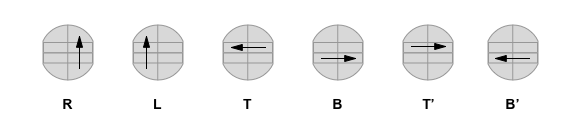
<p>Lets try to adopt a common notation usually used in Rubik’s cube. The difference is our R and L in Auzzle always rotate by full 180 degrees, so we won’t need R’ and L’, as they are identical to R and L.</p>
<p><img src="/images/auzzle/notation.png" alt=""></p>
<h2 id="Magic_algorithm">Magic algorithm</h2>
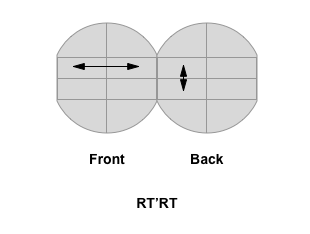
<p>As I’ve shown in my previous post, it is always possible to get to one of the solved state within 10 moves (in fact most cases can be solved within 5-7 moves), however our goal here is different, what we would like is to come up with one basic, intuitive and easy to remember algorithm, which, when applied properly, would help us solve the puzzle. There are multiple ways to go about it, but here one of them:</p>
<p><img src="/images/auzzle/algorithm.png" alt=""></p>
<p>What does it do? It just swaps top left and top right pieces on the front. There is a side effect, top and bottom pieces on the right back are being swapped too. Left back is being left completely untouched. Which means, if we have some pieces already paired, keeping them in the back and performing the algorithm will not mess up their pairing, and we pretty much can ignore the side effect.</p>
<h2 id="Phase_1:_Getting_to_one_pair">Phase 1: Getting to one pair</h2>
<p>We don’t really need any algorithm for this. We will just rotate the top (T) and will likely get at least one pair matched, if we don’t, after making a full circle, we rotate right side (R) and then rotate (T) again, we WILL eventually get some pairs matched.</p>
<p>If we are really lucky and we got all 4 matched, the puzzle is solved. If we got two pairs matched, we skip to phase 3. Otherwise we need to get us a second pair first.</p>
<h2 id="Phase_2:_Getting_the_second_pair">Phase 2: Getting the second pair</h2>
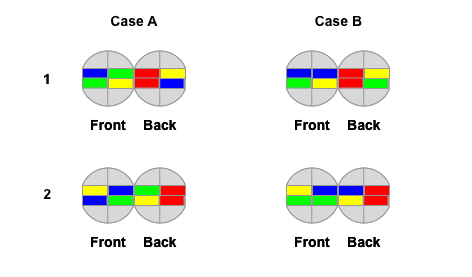
<p>Remember how we said our magic algorithm doesn’t really mess up anything in the back? So we can put our matched pair in the back left or right quadrant and try performing the algorithm to swap pieces at the front, until we get our second pair matched. The problem is, it won’t always work :) In order to explain why, I will use 4 different colors, as before, to represent 4 different matching pairs. Auzzle with one matched pair generally falls within one of the two cases above:</p>
<p><img src="/images/auzzle/secondpair.png" alt=""></p>
<p><code>Note: If you look closely, A1 and A2 is actually the same case, just rotated 90 degrees. Similarly B2 is just a rotated B1.</code></p>
<p>Case A: This is the easy one, for each unsolved pair, one piece is located on the top and one on the bottom. It doesn’t matter where we put our first matched (red) pair, as long as it is on the back it will remain untouched. But the moment we perform our magic algorithm, second pair (either green or blue) is going to get matched.</p>
<p>Case B: Here matching pieces are colocated on the same top or bottom planes. Which means performing the magic algorithm will not result in any new pairs being created. </p>
<p>How can we know whether we are in case A or B? That is actually easy, we can rotate the top layer one click right (T’) or left (T). If another pair (our green or blue ones) is getting matched, we are in case A, otherwise we are in case B.</p>
<h2 id="Phase_3:_Last_two_pairs">Phase 3: Last two pairs</h2>
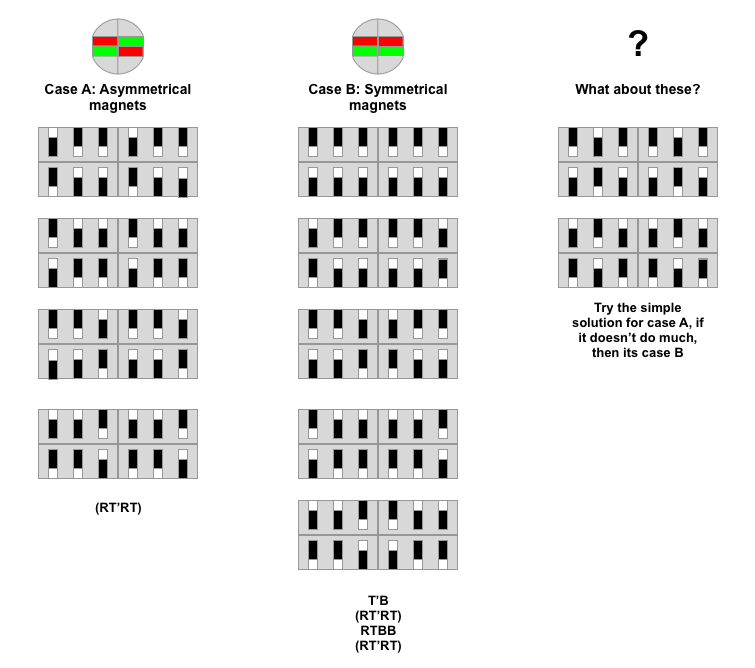
<p>Ok, we got 2 pairs matched, just bring them both to the back, and lets work with the unmatched pieces at the front. There are two ways how 2 pairs can be potentially unmatched (see diagram below). On a real Auzzle we obviously won’t see green and red segment colors like in the diagram below, but we can see the magnets interaction and infer the case we are dealing with:</p>
<p><img src="/images/auzzle/final.png" alt=""></p>
<p>Case A: The easiest one is when we notice an asymmetrical configuration of the magents. The pieces are crossed! We can just perform our magic algorithm to swap to top left and right pieces and the puzzle is solved!</p>
<p>Case B: This one is a bit trickier. The left and the right side are clearly symmetrical. That tells us the pieces are not crossed. Swapping two top ones will not help us much, we will end up exactly where we started. We need to break the “parity” of the puzzle and get to the Case A we love so much.</p>
<p>There are also two magnet configuration which don’t tell us whether we are in A or B. How can we know? Lets try to rotate top layer (T’). If the this is case A (crossed), we will immediately see the pair matched, we are in Case A, rotate the top layer back (T) and perform the magic algorithm. Otherwise we are in Case B. </p>
<p><code>In fact, if you would rather not think at all about Case A or Case B and dont&#39; care about few extra twists, you can always try to perform the algorithm for A, and if the puzzle is not solved continue to B (i.e</code></p>
<p>I am sure there are more effective ways to solve the puzzle with less (5-7) moves, even just memorizing and using all the mirror variations of our magic algorithm above would make a huge difference and save tons of unnecessary moves. Phase 2 should be improved too. It’s a start, stay tuned for updates.  </p>
]]></content>
    <summary type="html">
    <![CDATA[<p>In this post I continue the analysis of Auzzle, the magnetic puzzle invented by Ilya Osipov and attempt to come up with a simple to remem]]>
    </summary>
    
      <category term="puzzles, hobby" scheme="http://finik.net/tags/puzzles-hobby/"/>
    
  </entry>
  
  <entry>
    <title><![CDATA[Auzzle Puzzle]]></title>
    <link href="http://finik.net/2018/12/24/Auzzle-Puzzle/"/>
    <id>http://finik.net/2018/12/24/Auzzle-Puzzle/</id>
    <published>2018-12-24T08:17:17.000Z</published>
    <updated>2018-12-31T21:25:24.629Z</updated>
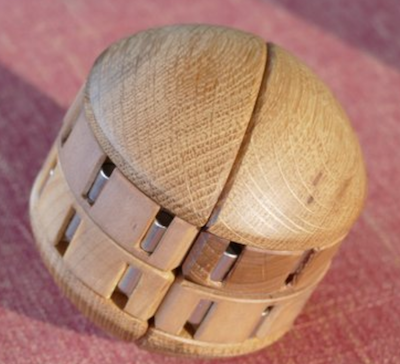
    <content type="html"><![CDATA[<p>Below are my notes and a quick brute force scanning of the rotating puzzle called Auzzle by Ilya Osipov.</p>
<p><img src="/images/auzzle/woodpic.png" alt=""></p>
<p><a href="https://www.facebook.com/AuzzlePuzzle/" target="_blank" rel="external">https://www.facebook.com/AuzzlePuzzle/</a></p>
<p><a href="https://www.youtube.com/watch?v=c7eOGJ46Mu4" target="_blank" rel="external">https://www.youtube.com/watch?v=c7eOGJ46Mu4</a></p>
<p>Disclaimer: I do not own one. All the work below is my attempt to analyze it after having the pleasure to see and play with a prototype for a few minutes.</p>
<h2 id="Theory">Theory</h2>
<p>At first glance the puzzle looks quite overwhelming. It consists of 24 magnets, arranged in pairs, and depending on the polarity of the magnets in the pair, they are either pulled towards the middle, or pushed towards the outer edges. The wooden or plastic pieces holding these magnets can be rotated in multiple directions, constantly changing the matching between the magnets. The puzzle is solved only when all 12 pairs of magnets are pulled towards the middle.</p>
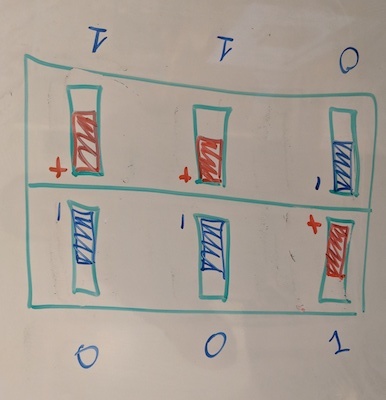
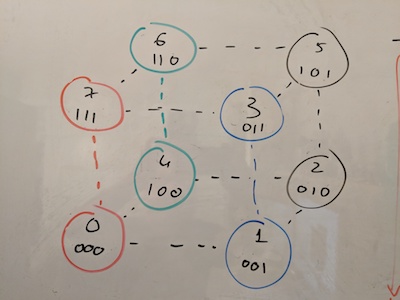
<p>After further inspection, however, it becomes clear that the things are not as bad as they seem. There are actually only 8 unique solid wooden or plastic pieces, each one containing 3 magnets. In other words, only 4 pairs of 2 pieces each. The placement of the magnets within each piece is unique, we can actually represent it as a binary encoding, 1 if the magnets ‘+’ is pointing towards the center, and 0 if ‘+’ points towards the outer edge. Unsurprisingly, 3 bits is the exact number required to encode 8 unique pieces: #0=000, #1=001, #2=010, #3=011, #4=100, #5=101, #6=110, #7=111.</p>
<p>Therefore, each piece has only one and only one matching piece resulting in all 3 pairs of magnets pulling towards the middle.</p>
<p><img src="/images/auzzle/magnets.jpg" alt=""></p>
<p>If we keep thinking in binary, in order for a pair of pieces to be each others matching counterparts, the following condition has to be true:</p>
<p><strong>A xor reversed(B) == 7</strong></p>
<p><code>It is easy to overlook the &quot;reversed&quot; part, but it is important! We encode every piece in the same way, 1 always means &#39;+&#39; pole is oriented towards the center. Pieces will change their orientation, sometimes they will face up and sometimes down, but when faced each other, we can&#39;t operate directly on their encodings, we must remember the top one is upside down (i.e piece 001 (1) will atract magnets in the 110 (6) formation, however the actual encoding of that opposing top piece is 011 (3))</code></p>
<p>In other words, in order to solve the puzzle, piece #0 must be placed against piece #7, #4 against #6, #1 against #3 and #2 against #5.</p>
<p><img src="/images/auzzle/solution.jpg" alt=""></p>
<h3 id="Total_combinations">Total combinations</h3>
<p>Total amount of permutations for 8 unique pieces is 8! = 40,320</p>
<p>We also need to multiply it by 2 to account for two possible states of the outer shell in relation to the internal mechanism.</p>
<p>However if we take any state of the puzzle, whether we rotate it by 180 degrees along X or rotate it in any of the 4 orentations along axis Y, it is still the same state, we don’t want to count each state 8 times, so we divide by 8 respectively.</p>
<p><strong>Total number of combinations: 8! x 2 / 8 = 10,080</strong></p>
<p>What about possible solutions?</p>
<p>The picture above shows only one possible solution of the puzzle. However it immediately becomes clear that the puzzle has many possible solutions: a) within each pair, the two pieces can swap places; b) the position of the pairs relative to one another can change and the puzzle would still remain solved. </p>
<p>Permitations to place 2 matching pieces within a pair: 2</p>
<p>We have 4 of these pairs, so total number of permutations is 2^4</p>
<p>Number of ways to place pairs in relation to one another: 4!</p>
<p>Similarly to how we did it before, we multiple by 2 to account for 2 possible states of the outer edge.</p>
<p>And, again, divide by 8 to account for rotation of the whole construction and avoid counting each state as 8 different ones.</p>
<p><strong>Total number of solutions: 4! x 2^4 x 2 / 8 = 96</strong></p>
<p><strong>Observation #1</strong>: It is possible to screw up the assembly of the puzzle and insert magnets in a way that will result in pieces with identical encodings existing within the same puzzle. The number of possible solved combinations will increase, the total number of combinations will decrease. Ouch!</p>
<p><strong>Observation #2</strong>: In a proper puzzle that actually has 8 uniquely encoded pieces, it is IMPOSSIBLE to get to a state where all the 12 pairs are pushed towards the outer edges. Piece #0 (000) will only push all 3 magnets when paired with another #0, and since there should be only one #0 piece in the puzzle that should never happen. This is true for any encoding that is a ‘palyndrome’ in a 3bit range (i.e #0, #2, #5, #7) (see <a href="#4bit">4bit</a> variation for a way to possibly do it with 4 bits)</p>
<h2 id="Practice">Practice</h2>
<p>In order to validate my theory and also calculate the <strong>God’s Number</strong> (maximum number of moves God has to perform to get to a solved state), I’ve written a simple simulator that tries to scan all possible states by doing it in reverse, starting with a solved state and traversing the tree of all the possible states. The code can be found in <a href="https://github.com/finik/AuzzlePuzzle/blob/master/sim.py" target="_blank" rel="external">sim.py</a>. It starts at the at the initial solved state shown in the picture above, then performs a BFS’ish scan of the whole space by performing all possible operations. For every state, to avoid double counting rotations (remember the division by 8), it rotates the whole puzzle to a <strong>canonical</strong> state where piece #0 is inside the lower left quadrant. </p>
<figure class="highlight"><table><tr><td class="gutter"><pre><div class="line">1</div><div class="line">2</div><div class="line">3</div><div class="line">4</div><div class="line">5</div><div class="line">6</div><div class="line">7</div><div class="line">8</div><div class="line">9</div><div class="line">10</div><div class="line">11</div><div class="line">12</div><div class="line">13</div></pre></td><td class="code"><pre><div class="line">python sim.py</div><div class="line">Total combinations: <span class="number">10080</span>, Solutions: <span class="number">96</span>, Max path <span class="built_in">to</span> solution: <span class="number">10</span></div><div class="line">Number <span class="operator">of</span> paths <span class="operator">of</span> <span class="built_in">length</span> <span class="number">0</span>: <span class="number">96</span></div><div class="line">Number <span class="operator">of</span> paths <span class="operator">of</span> <span class="built_in">length</span> <span class="number">1</span>: <span class="number">192</span></div><div class="line">Number <span class="operator">of</span> paths <span class="operator">of</span> <span class="built_in">length</span> <span class="number">2</span>: <span class="number">288</span></div><div class="line">Number <span class="operator">of</span> paths <span class="operator">of</span> <span class="built_in">length</span> <span class="number">3</span>: <span class="number">480</span></div><div class="line">Number <span class="operator">of</span> paths <span class="operator">of</span> <span class="built_in">length</span> <span class="number">4</span>: <span class="number">768</span></div><div class="line">Number <span class="operator">of</span> paths <span class="operator">of</span> <span class="built_in">length</span> <span class="number">5</span>: <span class="number">1824</span></div><div class="line">Number <span class="operator">of</span> paths <span class="operator">of</span> <span class="built_in">length</span> <span class="number">6</span>: <span class="number">2688</span></div><div class="line">Number <span class="operator">of</span> paths <span class="operator">of</span> <span class="built_in">length</span> <span class="number">7</span>: <span class="number">3264</span></div><div class="line">Number <span class="operator">of</span> paths <span class="operator">of</span> <span class="built_in">length</span> <span class="number">8</span>: <span class="number">192</span></div><div class="line">Number <span class="operator">of</span> paths <span class="operator">of</span> <span class="built_in">length</span> <span class="number">9</span>: <span class="number">192</span></div><div class="line">Number <span class="operator">of</span> paths <span class="operator">of</span> <span class="built_in">length</span> <span class="number">10</span>: <span class="number">96</span></div></pre></td></tr></table></figure>

<p>I am sure it can be done much more efficiently, but that was a quick and dirty exercise and it proves my theoretical calulations (the numbers match!). It also reveals the God’s Number for Auzzle, that number is 10! 10 moves is all it takes to get from the worst position to one of the 96 solved states.</p>
<h2 id="Actually_solving_it">Actually solving it</h2>
<p>Given the total number of combinations and the total number of solutions, it is actually pretty easy to get to one of the solved states just by fidgeting with the puzzle enough time.</p>
<p>If we mark the matching pieces with 4 different colors like in the picture above, the puzzle is trivial to solve systematically. In fact, we can think of it as a subset of a 2x2x2 cube where one axis rotates only by 180 and another axis doesn’t rotate at all. </p>
<p>However, individual pieces are not marked and the only thing that can be observed externally by looking at the magnets is the result of the interaction between two adjustent pieces (representing <strong>A xor reversed(B)</strong>). This  makes it much more challenging. </p>
<p><strong>Update:</strong> I’ve 3d printed an Auzzle and played with it a bit, please see my next post on actually <a href="/2018/12/30/Auzzle-Solution/">solving it</a>.</p>
<h2 id="Variations">Variations</h2>
<h3 id="4bit">4bit</h3>
<p>In this variant, we have more possible encodings (16) than needed to represent 8 unique pieces, however that allows us to skip encodings that require duplicated pieces:</p>
<p>a) Avoid encodings #0, #6, #9 and #15 (#0 will only fully push away another #0, etc)</p>
<p>b) Avoid encodings #5, #3, #10, #12 (#5 will only fully pull another #5, etc)</p>
<p>That leaves with 8 encodings that do not have any of the issues above, each one of them has a proper counterpart for pulling all 4 of its magnets and and another one of pushing all 4. These encodings are: #1, #2, #4, #7, #8, #11, #13 and #14. And the actual matching pairs for both solutions are as follows:</p>
<p><strong>All magnets pulled inside:</strong> (#1, #7), (#8, #14), (#2, #11), (#4, #13)</p>
<p><strong>All magnets pushed outside:</strong> (#1, #8), (#2, #4), (#7, #14), (#11, #13)</p>
<p>It would be logical to assume the total amount of combination will not change (the amount of pieces did not change, it is still 8). The amount of solution states should probably double to 192 (96 inside and 96 outside), and the God’s number should probably decrease by 1 as well (worst case should probably be only 9 moves away from one of the solved states). To test it, I’ve duplicated the simulation and modified it to work with the 4bit encodings above, the code can be found <a href="https://github.com/finik/AuzzlePuzzle/blob/master/sim-4bits.py" target="_blank" rel="external">sim-4bit.py</a></p>
<p>Results:</p>
<figure class="highlight"><table><tr><td class="gutter"><pre><div class="line">1</div><div class="line">2</div><div class="line">3</div><div class="line">4</div><div class="line">5</div><div class="line">6</div><div class="line">7</div><div class="line">8</div><div class="line">9</div><div class="line">10</div><div class="line">11</div><div class="line">12</div></pre></td><td class="code"><pre><div class="line">python sim-<span class="number">4</span>bits.py</div><div class="line">Total combinations: <span class="number">10080</span>, Solutions: <span class="number">192</span>, Max path <span class="built_in">to</span> solution: <span class="number">9</span></div><div class="line">Number <span class="operator">of</span> paths <span class="operator">of</span> <span class="built_in">length</span> <span class="number">0</span>: <span class="number">192</span></div><div class="line">Number <span class="operator">of</span> paths <span class="operator">of</span> <span class="built_in">length</span> <span class="number">1</span>: <span class="number">368</span></div><div class="line">Number <span class="operator">of</span> paths <span class="operator">of</span> <span class="built_in">length</span> <span class="number">2</span>: <span class="number">512</span></div><div class="line">Number <span class="operator">of</span> paths <span class="operator">of</span> <span class="built_in">length</span> <span class="number">3</span>: <span class="number">800</span></div><div class="line">Number <span class="operator">of</span> paths <span class="operator">of</span> <span class="built_in">length</span> <span class="number">4</span>: <span class="number">1184</span></div><div class="line">Number <span class="operator">of</span> paths <span class="operator">of</span> <span class="built_in">length</span> <span class="number">5</span>: <span class="number">2496</span></div><div class="line">Number <span class="operator">of</span> paths <span class="operator">of</span> <span class="built_in">length</span> <span class="number">6</span>: <span class="number">2816</span></div><div class="line">Number <span class="operator">of</span> paths <span class="operator">of</span> <span class="built_in">length</span> <span class="number">7</span>: <span class="number">1616</span></div><div class="line">Number <span class="operator">of</span> paths <span class="operator">of</span> <span class="built_in">length</span> <span class="number">8</span>: <span class="number">48</span></div><div class="line">Number <span class="operator">of</span> paths <span class="operator">of</span> <span class="built_in">length</span> <span class="number">9</span>: <span class="number">48</span></div></pre></td></tr></table></figure>

<p>Yeap, we guessed right!</p>
]]></content>
    <summary type="html">
    <![CDATA[<p>Below are my notes and a quick brute force scanning of the rotating puzzle called Auzzle by Ilya Osipov.</p>
<p><img src="/images/auzzle/]]>
    </summary>
    
      <category term="puzzles, hobby" scheme="http://finik.net/tags/puzzles-hobby/"/>
    
  </entry>
  
  <entry>
    <title><![CDATA[iOS Crash Symbolication for dummies Part 2]]></title>
    <link href="http://finik.net/2017/03/20/iOS-Crash-Symbolication-for-dummies-Part-2/"/>
    <id>http://finik.net/2017/03/20/iOS-Crash-Symbolication-for-dummies-Part-2/</id>
    <published>2017-03-20T23:18:04.000Z</published>
    <updated>2017-12-17T00:28:14.703Z</updated>
    <content type="html"><![CDATA[<p>In the <a href="/2017/03/08/iOS-Crash-Symbolication-for-dummies-Part-1/">previous post</a>, we’ve learned what is symbolication process and why it is needed. In this post we will dive deeper and learn how to make sure a dSYM file is generated and see how we can manually use it to symbolicate crash reports.</p>
<h2 id="How_do_I_make_sure_dSYM_is_actually_being_generated?">How do I make sure dSYM is actually being generated?</h2>
<p>XCode has several settings that may affect dSYM generation, let’s review them one by one.</p>
<p>First of all, let’s make sure that debug information is being generated:</p>
<p><img src="/images/symbolication2/generate.png" alt=""></p>
<p>Let’s instruct XCode to put the debug symbols in a separate dSYM file:</p>
<p><img src="/images/symbolication2/format.png" alt=""></p>
<p>By default that option is only selected for release builds, but not for debug builds. In most cases it is enough, as most commonly debug builds are only used by the developer while debugging their own application while being attached to XCode. However when trying out symbolication or when there is a chance a debug build is going to end up on a device of a colleague who is going to test it, we may still opt to have the dSYM file to be able to analyze the crashes.</p>
<p>And last, but not the least important:</p>
<p><img src="/images/symbolication2/strip.png" alt=""></p>
<p>This option is not important for the symbolication process itself, but it is important to check it, as it instructs XCode to strip the debug symbols from the binary file itself, the file we are going to distribute to App Store. It both affects the size of the distributed application, but more importantly, leaving debug information in the application makes our competitors’ life much easier.</p>
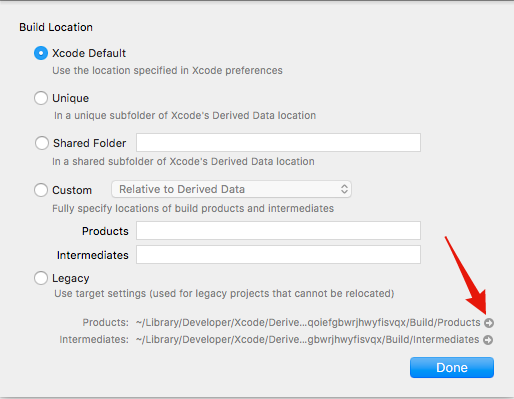
<p>With all these options checked, our next build should produce a dSYM file (or rather a series of dSYM files, one for our main application and one for each framework we build as part of our application). The files are located in the products folder. Apple made it quite tricky to find it, one common method is to look at the build logs and copy the path from there. There is an alternative way through XCode:</p>
<ul>
<li>Go to File-&gt;Project settings</li>
<li>Click on Advanced</li>
<li>Clicking on that small arrow will reveal the product folder in Finder</li>
</ul>
<p><img src="/images/symbolication2/project.png" alt=""></p>
<blockquote>
<p>Note: XCode 8.2 was used at the time of writing the post, the options may differ in other XCode versions.</p>
</blockquote>
<h2 id="What_can_I_do_with_a_crash_report_and_a_dSYM_file?">What can I do with a crash report and a dSYM file?</h2>
<p>Let’s say we have that raw crash report with addresses and a dSYM file that we know is the matching one. What can we do with it?<br>The address and the dSYM file should be enough to extract debug information about that address, but there is still one element missing. We need to know the exact address that image was loaded at for that specific crash. The reason for this is operating system randomizes the offset at which programs are being loaded every time they are ran. The technique is usually called <a href="https://en.wikipedia.org/wiki/Address_space_layout_randomization" target="_blank" rel="external">ASLR</a> (Address Space Layout Randomization) and it is mostly done for security reasons, as it prevents exploits that rely on a specific layout of the program at runtime.</p>
<p>This is where the list of all the loaded images comes into play. If you are dealing with raw crash reports generated by XCode, it can be found<br>in the “Binary images” section of the text file.</p>
<figure class="highlight"><table><tr><td class="gutter"><pre><div class="line">1</div><div class="line">2</div><div class="line">3</div><div class="line">4</div><div class="line">5</div><div class="line">6</div><div class="line">7</div><div class="line">8</div><div class="line">9</div><div class="line">10</div><div class="line">11</div></pre></td><td class="code"><pre><div class="line">Binary Images:</div><div class="line">       <span class="number">0x10007C000</span> -        <span class="number">0x1002C3FFF</span> +MyApplication arm64   /var/containers/Bundle/Application/MyApplication.app/MyApplication</div><div class="line">       <span class="number">0x184158000</span> -        <span class="number">0x184159FFF</span>  libSystem.B.dylib arm64   /usr/lib/libSystem.B.dylib</div><div class="line">       <span class="number">0x18415A000</span> -        <span class="number">0x1841AFFFF</span>  libc++<span class="string">.1</span>.dylib arm64   /usr/lib/libc++<span class="string">.1</span>.dylib</div><div class="line">       <span class="number">0x1841B0000</span> -        <span class="number">0x1841D0FFF</span>  libc++abi.dylib arm64   /usr/lib/libc++abi.dylib</div><div class="line">       <span class="number">0x1841D4000</span> -        <span class="number">0x1845ADFFF</span>  libobjc.A.dylib arm64   /usr/lib/libobjc.A.dylib</div><div class="line">       <span class="number">0x184871000</span> -        <span class="number">0x184871FFF</span>  libvminterpose.dylib arm64   /usr/lib/system/libvminterpose.dylib</div><div class="line">       <span class="number">0x184872000</span> -        <span class="number">0x184898FFF</span>  libxpc.dylib arm64   /usr/lib/system/libxpc.dylib</div><div class="line">       <span class="number">0x184899000</span> -        <span class="number">0x184AB3FFF</span>  libicucore.A.dylib arm64   /usr/lib/libicucore.A.dylib</div><div class="line">       <span class="number">0x184AB4000</span> -        <span class="number">0x184AC4FFF</span>  libz<span class="string">.1</span>.dylib arm64   /usr/lib/libz<span class="string">.1</span>.dylib</div><div class="line">       <span class="number">0x185675000</span> -        <span class="number">0x1859F9FFF</span>  CoreFoundation arm64   /System/Library/Frameworks/CoreFoundation.framework/CoreFoundation</div></pre></td></tr></table></figure>

<p>Now that we know that at that particular run our application has been loaded at 0x10007C000, we can use the atos tool that comes with XCode to try to extract more info:</p>
<figure class="highlight"><table><tr><td class="gutter"><pre><div class="line">1</div><div class="line">2</div></pre></td><td class="code"><pre><div class="line">$ atos -o MyApplication.app.dSYM -l <span class="number">0x10007C000</span> <span class="number">0x100117f48</span></div><div class="line">getElementFromArray (<span class="keyword">in</span> MyApplication.app.dSYM) (AppDelegate.m:<span class="number">22</span>)</div></pre></td></tr></table></figure>

<p>That seems to be working. But that is a lot of tedious work if we do it manually. If we want to get nice human readable snapshot of the callstack, then for each address, we have to:</p>
<ul>
<li>Find the image that address is corresponding to in that particular run of the application (remember the ASLR?).</li>
<li>Get the start address for that image</li>
<li>Locate the dSYM file for that specific image. (Where do we get dSYM files for all the system images? *)</li>
<li>Use atos tool to translate the address into a human readable location.</li>
</ul>
<p>When you deal with XCode raw crash reports, there is a perl script that’s shipped in one of the frameworks that can partially automate this flow.<br>In XCode 8.2 it can be found in:<br>/Applications/Xcode.app/Contents/SharedFrameworks/DVTFoundation.framework/Versions/A/Resources/symbolicatecrash<br>but it may vary from version to version.</p>
<figure class="highlight"><table><tr><td class="gutter"><pre><div class="line">1</div></pre></td><td class="code"><pre><div class="line">$ <span class="keyword">find</span> /Applications/Xcode.app -name symbolicatecrash -<span class="built_in">type</span> <span class="keyword">f</span></div></pre></td></tr></table></figure>

<p>Now we can try to symbolicate the whole report at once:</p>
<figure class="highlight"><table><tr><td class="gutter"><pre><div class="line">1</div></pre></td><td class="code"><pre><div class="line">path<span class="regexp">/to/</span>symbolicatecrash <span class="regexp">/path/</span>to<span class="regexp">/MyApplication_2016-12-19_Device.crash /</span>path<span class="regexp">/to/</span>MyApplication.app.dSYM</div></pre></td></tr></table></figure>

<blockquote>
<ul>
<li>In fact, locating dSYM files for system frameworks is major pain point for most developers. These dSYM files are usually located in ~/Library/Developer/Xcode/iOS\ DeviceSupport/ folder. However this folder is populated by XCode and only contains symbols for iOS versions and architectures that were attached to that particular XCode. (i.e if you’ve never debugged an armv7 device running iOS 8.2 to your Mac, you will not have iOS 8.2 armv7 symbols on this machine.) Good news is starting with iOS 10, Apple dropped the support for all old armv7 devices, and both arm64 and armv7s support files are shipped with iOS regardless of the arch of the device itself. So it is enough now to attach any device with iOS 10.2 to XCode to have support files both for armv7s and arm64 flavors. It is still practically impossible to “collect them all”, however, especially when Apple sometimes releases iOS beta builds daily.</li>
</ul>
</blockquote>
<p>With this script in hand we know how to completely symbolicate one single crash. And that is assuming we got the crash report itself, all the dSYM files, all the tools and a lot of patience. In the real world however, this approach becomes impractical really quickly, as our app is deployed on thousands (hopefully millions!) of devices, all having different iOS versions and architectures. And in order to have a complete solution we have to:</p>
<ul>
<li>Have system frameworks dSYM files for all available iOS versions and architectures out there</li>
<li>Be able to match and combine similar crashes, even if they have somewhat different stack traces, but share identical root cause</li>
<li>Automatically catalogue dSYM files for each application and framework build we produce</li>
<li>Detect, register and process every crash from every user and device</li>
<li>Analyze app crash statistics and trends per device, iOS version, App version, etc.</li>
</ul>
<p>That is exactly where 3rd party crash reporting services come into the picture. Crash reporting can do that and much more, leaving us time to focus on building the app itself instead of spending precious time on building infrastructure and toolchains for debugging and analysis. Crash reporting services differ when it comes to quality of the stack trace reports, as well additional contextual information they provide about the crashes. <a href="https://www.bugsee.com" target="_blank" rel="external">Bugsee</a> crash reporting has recently been ranked the highest among all iOS crash reporting services when it comes to accuracy and the amount of details in the report. Bugsee doesn’t stop there, however, it also presents video of user actions, console logs and network traffic that preceded the crash.</p>
<p>In the <a href="">next post</a> of the series, we will be diving deeper into advanced topics of symbolication such as Bitcode.</p>
]]></content>
    <summary type="html">
    <![CDATA[<p>In the <a href="/2017/03/08/iOS-Crash-Symbolication-for-dummies-Part-1/">previous post</a>, we’ve learned what is symbolication process a]]>
    </summary>
    
      <category term="ios, symbolication, dsym" scheme="http://finik.net/tags/ios-symbolication-dsym/"/>
    
  </entry>
  
  <entry>
    <title><![CDATA[iOS Crash Symbolication for dummies Part 1]]></title>
    <link href="http://finik.net/2017/03/08/iOS-Crash-Symbolication-for-dummies-Part-1/"/>
    <id>http://finik.net/2017/03/08/iOS-Crash-Symbolication-for-dummies-Part-1/</id>
    <published>2017-03-09T00:07:30.000Z</published>
    <updated>2017-12-17T00:29:09.988Z</updated>
    <content type="html"><![CDATA[<p>Many developers use Bugsee for its great crash reporting capabilities. In fact, Bugsee crash reporting has recently been ranked the highest among all iOS crash reporting services when it comes to accuracy and the amount of details in the report. Bugsee doesn’t stop there, however, it also presents video of user actions, console logs and network traffic that preceded the crash.</p>
<p>In the following series of posts we are actually going to focus on the crash log itself, explain the magic behind it and show how to properly set it up.</p>
<p>First post in the series is an introductory one. </p>
<h2 id="What_is_symbolication?">What is symbolication?</h2>
<p>In order to answer that question we must briefly touch on the build process itself. Regardless of the language our project is written in (be that Objective C, Swift or any other), the build process translates our human readable code into machine binary code. Consider the following buggy code (can you spot the bug?).</p>
<figure class="highlight"><table><tr><td class="gutter"><pre><div class="line">1</div><div class="line">2</div><div class="line">3</div><div class="line">4</div><div class="line">5</div><div class="line">6</div><div class="line">7</div><div class="line">8</div><div class="line">9</div><div class="line">10</div><div class="line">11</div><div class="line">12</div><div class="line">13</div></pre></td><td class="code"><pre><div class="line"><span class="type">void</span> initialize() {</div><div class="line">     <span class="type">array</span> = @[@<span class="string">"one"</span>, @<span class="string">"two"</span>, @<span class="string">"three"</span>];</div><div class="line">}</div><div class="line"></div><div class="line"><span class="type">NSNumber</span>* getElementFromArray(<span class="type">int</span> index) {</div><div class="line">    <span class="keyword">return</span> <span class="type">array</span>[index];</div><div class="line">}</div><div class="line"></div><div class="line"><span class="type">void</span> printAllElements() {</div><div class="line">    <span class="keyword">for</span> (<span class="type">int</span> i = <span class="number">0</span>; i &lt;= <span class="number">3</span>; i++) {</div><div class="line">        <span class="type">NSLog</span>(@<span class="string">"%@"</span>, getElementFromArray(i));</div><div class="line">    }</div><div class="line">}</div></pre></td></tr></table></figure>

<p>After build it will eventually become this:</p>
<figure class="highlight"><table><tr><td class="gutter"><pre><div class="line">1</div><div class="line">2</div><div class="line">3</div><div class="line">4</div><div class="line">5</div><div class="line">6</div><div class="line">7</div><div class="line">8</div><div class="line">9</div><div class="line">10</div><div class="line">11</div><div class="line">12</div><div class="line">13</div><div class="line">14</div><div class="line">15</div><div class="line">16</div><div class="line">17</div><div class="line">18</div><div class="line">19</div><div class="line">20</div><div class="line">21</div><div class="line">22</div><div class="line">23</div><div class="line">24</div><div class="line">25</div><div class="line">26</div><div class="line">27</div><div class="line">28</div><div class="line">29</div><div class="line">30</div><div class="line">31</div><div class="line">32</div><div class="line">33</div><div class="line">34</div><div class="line">35</div><div class="line">36</div></pre></td><td class="code"><pre><div class="line"></div><div class="line"><span class="number">0x100117dec</span>: stp    x29, x30, [<span class="literal">sp</span>, #-<span class="number">16</span>]!     <span class="comment">; &lt;--- Start of the initialize() method</span></div><div class="line">&lt;..<span class="string">.skipped</span>...&gt;</div><div class="line"><span class="number">0x100117e9c</span>: ldp    x29, x30, [<span class="literal">sp</span>], #<span class="number">16</span></div><div class="line"><span class="number">0x100117ea0</span>: <span class="keyword">ret</span>    </div><div class="line"><span class="number">0x100117ea4</span>: <span class="literal">bl</span>     <span class="number">0x10022d83c</span></div><div class="line"><span class="number">0x100117ea8</span>: stp    x29, x30, [<span class="literal">sp</span>, #-<span class="number">16</span>]!     <span class="comment">; &lt;--- Start of the printAllElements() method</span></div><div class="line"><span class="number">0x100117eac</span>: <span class="keyword">mov</span>    x29, <span class="literal">sp</span></div><div class="line"><span class="number">0x100117eb0</span>: <span class="keyword">sub</span>    <span class="literal">sp</span>, <span class="literal">sp</span>, #<span class="number">32</span>                </div><div class="line"><span class="number">0x100117eb4</span>: stur   wzr, [x29, #-<span class="number">4</span>]</div><div class="line"><span class="number">0x100117eb8</span>: ldur   w8, [x29, #-<span class="number">4</span>]</div><div class="line"><span class="number">0x100117ebc</span>: <span class="keyword">cmp</span>    w8, #<span class="number">3</span>                    </div><div class="line"><span class="number">0x100117ec0</span>: b.gt   <span class="number">0x100117f08</span>               </div><div class="line"><span class="number">0x100117ec4</span>: ldur   w0, [x29, #-<span class="number">4</span>]</div><div class="line"><span class="number">0x100117ec8</span>: <span class="literal">bl</span>     <span class="number">0x100117f14</span>               <span class="comment">; &lt;---- this is where it calls getElementFromArray()</span></div><div class="line"><span class="number">0x100117ecc</span>: <span class="keyword">mov</span>    x29, x29</div><div class="line"><span class="number">0x100117ed0</span>: <span class="literal">bl</span>     <span class="number">0x10022d668</span>               </div><div class="line">&lt;..<span class="string">.skipped</span>...&gt;</div><div class="line"><span class="number">0x100117f0c</span>: ldp    x29, x30, [<span class="literal">sp</span>], #<span class="number">16</span></div><div class="line"><span class="number">0x100117f10</span>: <span class="keyword">ret</span>    </div><div class="line"><span class="number">0x100117f14</span>: stp    x29, x30, [<span class="literal">sp</span>, #-<span class="number">16</span>]!	  <span class="comment">; &lt;--- Start of getElementFromArray() method</span></div><div class="line"><span class="number">0x100117f18</span>: <span class="keyword">mov</span>    x29, <span class="literal">sp</span></div><div class="line"><span class="number">0x100117f1c</span>: <span class="keyword">sub</span>    <span class="literal">sp</span>, <span class="literal">sp</span>, #<span class="number">16</span>               </div><div class="line"><span class="number">0x100117f20</span>: adrp   x8, <span class="number">436</span></div><div class="line"><span class="number">0x100117f24</span>: <span class="keyword">add</span>    x8, x8, #<span class="number">2520</span>              </div><div class="line"><span class="number">0x100117f28</span>: adrp   x9, <span class="number">452</span></div><div class="line"><span class="number">0x100117f2c</span>: <span class="keyword">add</span>    x9, x9, #<span class="number">1512</span>             </div><div class="line"><span class="number">0x100117f30</span>: stur   w0, [x29, #-<span class="number">4</span>]</div><div class="line"><span class="number">0x100117f34</span>: ldr    x9, [x9]</div><div class="line"><span class="number">0x100117f38</span>: ldursw x2, [x29, #-<span class="number">4</span>]</div><div class="line"><span class="number">0x100117f3c</span>: ldr    x1, [x8]</div><div class="line"><span class="number">0x100117f40</span>: <span class="keyword">mov</span>    x0, x9</div><div class="line"><span class="number">0x100117f44</span>: <span class="literal">bl</span>     <span class="number">0x10022d608</span>               <span class="comment">; &lt;--- Here we send message to NSArray to retrive that element</span></div><div class="line"><span class="number">0x100117f48</span>: <span class="keyword">mov</span>    <span class="literal">sp</span>, x29</div><div class="line"><span class="number">0x100117f4c</span>: ldp    x29, x30, [<span class="literal">sp</span>], #<span class="number">16</span></div><div class="line"><span class="number">0x100117f50</span>: <span class="keyword">ret</span></div></pre></td></tr></table></figure>

<p>As you can see from this example, the build process got rid of all the symbols (variable and method names), it also doesn’t know anymore anything about the layout of our code, the amount if spaces we put to separate the functions, all that information is lost. So now when crash occurs (and it will occur, after all we access elements beyond the bounds of that array), if we don’t have symbolication properly set up, this is the only crash information we will end up with:</p>
<figure class="highlight"><table><tr><td class="gutter"><pre><div class="line">1</div><div class="line">2</div><div class="line">3</div><div class="line">4</div><div class="line">5</div><div class="line">6</div><div class="line">7</div></pre></td><td class="code"><pre><div class="line">NSRangeException: *** -[__NSArrayI objectAtIndex:]: index <span class="number">3</span> beyond bounds [<span class="number">0</span> .. <span class="number">2</span>]</div><div class="line"><span class="number">0</span> CoreFoundation      <span class="number">0x1857A51B8</span></div><div class="line"><span class="number">1</span> libobjc.A.dylib     <span class="number">0x1841DC55C</span></div><div class="line"><span class="number">2</span> CoreFoundation      <span class="number">0x1856807F4</span></div><div class="line"><span class="number">3</span> MyApplication       <span class="number">0x100117f48</span></div><div class="line"><span class="number">4</span> MyApplication       <span class="number">0x100117ecc</span></div><div class="line"><span class="number">5</span> <span class="keyword">...</span></div></pre></td></tr></table></figure>

<p>This is pretty raw, and not very useful. We know it failed in some method inside the CoreFoundation system method, which was in turn called from some method in libobjc.A.dylib, which was in turn called from another method in CoreFoundation, which in turn was called from our application (finally!). But what is 0x100117f48? Where exactly is it? What file, function or line number is it? That is exactly where symbolication comes in.</p>
<blockquote>
<p>Symbolication is the process of translating the return addresses back into human readable method/filename and line numbers.</p>
</blockquote>
<p>Successful symbolication will result in the following report instead:</p>
<figure class="highlight"><table><tr><td class="gutter"><pre><div class="line">1</div><div class="line">2</div><div class="line">3</div><div class="line">4</div><div class="line">5</div><div class="line">6</div></pre></td><td class="code"><pre><div class="line"><span class="tag">NSRangeException</span>: *** <span class="tag">-</span><span class="attr_selector">[__NSArrayI objectAtIndex:]</span>: <span class="tag">index</span> 3 <span class="tag">beyond</span> <span class="tag">bounds</span> <span class="attr_selector">[0 .. 2]</span></div><div class="line">0 <span class="tag">CoreFoundation</span>      __<span class="tag">exceptionPreprocess</span> + 124</div><div class="line">1 <span class="tag">libobjc</span><span class="class">.A</span><span class="class">.dylib</span>     <span class="tag">objc_exception_throw</span> + 52</div><div class="line">2 <span class="tag">CoreFoundation</span>      <span class="tag">-</span><span class="attr_selector">[__NSArrayI objectAtIndex:]</span> + 180</div><div class="line">3 <span class="tag">MyApplication</span>       <span class="tag">getElementFromArray</span> (<span class="tag">MyFile</span><span class="class">.m</span><span class="pseudo">:22)</span></div><div class="line">4 <span class="tag">MyApplication</span>       <span class="tag">printAllElements</span> (<span class="tag">MyFile</span><span class="class">.m</span><span class="pseudo">:27)</span></div></pre></td></tr></table></figure>

<p>Now it’s pretty obvious that crash was caused by some improper array access in line 22 of MyFile.m, which happens to be within getElementsArray method. And if we need more context, we can easily see this one was called by printAllElements at line 27 of the same file.</p>
<h2 id="What_is_a_dSYM_file?">What is a dSYM file?</h2>
<p>Luckily for us, XCode can be instructed to keep a lot of the data that is being lost during the build process. It can put it inside the application itself, but that is not a good idea. We do not want to ship our application with all these extra debugging information, it will make it very easy for our competitors and hackers to reverse engineer the app. We would like to have it generated, but kept out of the AppStore. That’s exactly what dSYM file is all about. During the build process, XCode strips all the debug information from the main executable file, and puts it inside a special file called dSYM. This helps to keep our executable small and easier to distribute to happy customers.</p>
<p>If our application is using frameworks, the product folder will have a separate dSYM file generated for each framework built. Eventually all of them are needed if we want to cover our bases and be able to symbolicate a crash in every possible location in our app.</p>
<p>Needless to say, a dSYM file generated while building a specific version of the application can only be used to symbolicate crashes from that specific version only.<br>dSYM files are identified by a Unique ID (UUID), which changes every time we modify and rebuild our code, and that ID is what is used to match a symbol file to a specific crash. A dSYM may be associated with more than one UUID, as it may contain debug information for more than one architecture.</p>
<p>The UUID of a dSYM can be easily retrieved using the dwarfdump command:</p>
<figure class="highlight"><table><tr><td class="gutter"><pre><div class="line">1</div><div class="line">2</div><div class="line">3</div></pre></td><td class="code"><pre><div class="line">$ dwarfdump -u MyApplication.app.dSYM</div><div class="line">UUID: <span class="number">9F</span>665FD6-E70C-<span class="number">3</span>EB9-<span class="number">8622</span>-<span class="number">34F</span>D9EC002CA (armv7) MyApplication.app.dSYM</div><div class="line">UUID: <span class="number">8</span>C2F9BB8-BB3F-<span class="number">37F</span>E-A83E-<span class="number">7F</span>2FF7B98889 (arm64) MyApplication.app.dSYM</div></pre></td></tr></table></figure>

<p>The dSYM above has debug information for both arm7 and arm64 flavors of our application, each flavor has its own UUID.</p>
<p>These dSYM files can and should be manually stored for future symbolication of the crashes in the production build. Alternatively they can be uploaded to a crash reporting service like Bugsee, where they will be put in a vault and will get eventually used for processing a crash for that specific build. Typically, a special <a href="https://docs.bugsee.com/sdk/ios/symbolication/" target="_blank" rel="external">build phase</a> is added to the build process that is responsible for uploading dSYM files to the vault.</p>
<h2 id="What_happens_during_iOS_crash?">What happens during iOS crash?</h2>
<p>During crash the following information is being collected on the device:</p>
<ul>
<li>Crash/exception type and an exception specific message (if and when available)</li>
<li>Stack trace for each thread (in raw form, the list of these unreadable return addresses that we saw before)</li>
<li>List of all images (user and system frameworks and extensions loaded by the application. Each one has a unique UUID to help match it to the right dSYM file)</li>
<li>Other information about the specific build, device, time of the crash, etc. These are less relevant to the symbolication process, but important nevertheless.</li>
</ul>
<p>This information is sent for processing to the crash reporting service, where it will be matched with proper dSYM files that were already uploaded at build time, or will be uploaded manually at a later time. The symbolication process happens on the server and produces a nice, human readable crash report that can either be viewed through a web dashboard or downloaded as a file. The report will typically include the items listed above (basic info, crash/exception details and symbolicated stack trace if all the stars are aligned and all symbol files were properly uploaded and processed.</p>
<p>That is what a typical crash reporting service provides.  Bugsee provides much more than that, to name a few, with Bugsee, these reports also include an interactive player that can play in a synchronized manner the following:</p>
<ul>
<li>Video of the screen and user interactions that preceded the crash</li>
<li>Network traffic, with complete request and response headers and body</li>
<li>System and application traces (disk space, cpu loads, top view and window names, etc.)</li>
<li>Your custom traces</li>
<li>Console logs</li>
</ul>
<p>This gives much more context that is of tremendous help when trying to debug an evasive issue that is only happening for customers in the field.</p>
<p>In the <a href="http://2017/03/20/iOS-Crash-Symbolication-for-dummies-Part-2/" target="_blank" rel="external">next post</a> of the series, we are diving deeper into symbolication process itself, and show how to manually symbolicate an address or a full Apple crash report.</p>
]]></content>
    <summary type="html">
    <![CDATA[<p>Many developers use Bugsee for its great crash reporting capabilities. In fact, Bugsee crash reporting has recently been ranked the highe]]>
    </summary>
    
      <category term="ios, symbolication, dsym" scheme="http://finik.net/tags/ios-symbolication-dsym/"/>
    
  </entry>
  
  <entry>
    <title><![CDATA[Managing iOS build configurations]]></title>
    <link href="http://finik.net/2016/08/30/Managing-iOS-build-configurations/"/>
    <id>http://finik.net/2016/08/30/Managing-iOS-build-configurations/</id>
    <published>2016-08-30T22:53:26.000Z</published>
    <updated>2017-12-17T00:32:48.925Z</updated>
    <content type="html"><![CDATA[<h2 id="Why?">Why?</h2>
<p>Applications today are rarely being built without 3rd party libraries and SDKs. There are libraries for integrating remote backends into your app. Libraries for effective image caching and loading. Libraries for gathering analytics and libraries for pushing messages. Libraries that help your users report issues, help you debug and analyze crashes. (Yes, that last one is Bugsee)</p>
<p>It is also a common practice for developers to maintain more than flavor of the application during active development. A debug version of the application may require a new version of the backend server which also might be under development still, it might send analytics data to a different service or it may need to include a helper library that is not necessary in the release version.</p>
<p>This following tutorial describes several options for maintaining different build configurations.</p>
<p>We are using Bugsee SDK as an example in this tutorial. At the same time, we do want to point out, that Bugsee SDK is extremely lightweight and doesn’t impact your user’s experience. Bugsee also passes all Apple Appstore requirements. A lot of Bugsee’s customers have seen the benefits of shipping the library in their App Store builds, it provides them with video-enabled crash reporting and in-app bug reporting.</p>
<h2 id="Debug_vs-_Release">Debug vs. Release</h2>
<p>This one is the default most common setup you get when you create your application with xCode. With preprocessor macros it is easy to differentiate at compile time between a Debug and a Release build. Thus, it is easy to launch (or not launch) a library in any particular configuration. Lets launch Bugsee only in Debug build.</p>
<figure class="highlight"><table><tr><td class="gutter"><pre><div class="line">1</div><div class="line">2</div><div class="line">3</div><div class="line">4</div><div class="line">5</div><div class="line">6</div><div class="line">7</div><div class="line">8</div><div class="line">9</div><div class="line">10</div><div class="line">11</div><div class="line">12</div></pre></td><td class="code"><pre><div class="line"><span class="preprocessor">#if DEBUG</span></div><div class="line"><span class="preprocessor">#import "Bugsee/Bugsee.h"</span></div><div class="line"><span class="preprocessor">#endif</span></div><div class="line"></div><div class="line">....</div><div class="line"></div><div class="line">- (BOOL)application:(UIApplication *)application</div><div class="line">    didFinishLaunchingWithOptions:(NSDictionary *)launchOptions {</div><div class="line">    <span class="comment">// ...other initialization code</span></div><div class="line"><span class="preprocessor">#if DEBUG </span></div><div class="line">    [Bugsee launchWithToken:@<span class="string">"your app token"</span>];</div><div class="line"><span class="preprocessor">#endif</span></div></pre></td></tr></table></figure>

<p>So now you don’t import and don’t run it, but the framework is still getting packaged into your application. If you use CocoaPods for you library management, there is a solution, starting with v0.34, CocoaPods honors build configurations. All you have to do is put the following in your Podfile:</p>
<figure class="highlight"><table><tr><td class="gutter"><pre><div class="line">1</div></pre></td><td class="code"><pre><div class="line">pod <span class="string">'Bugsee'</span>, <span class="symbol">:configurations</span> =&gt; [<span class="string">'Debug'</span>]</div></pre></td></tr></table></figure>

<p>Unfortunately, if you manually copy libraries into your project, you are out of luck.</p>
<h2 id="Debug_vs-_Release_(+TestFlight)">Debug vs. Release (+TestFlight)</h2>
<p>In this configuration you still manage and maintain two build flavors (Debug and Release). The Release build is first distributed to QA and Beta testers through Apple TestFlight and only when ready you promote it to App Store. The beauty of this approach is that it is the same build(same binary!). Thus, you can be sure there are no differences between what was tested and what was released. This means, however, that Bugsee SDK must be part of that Release build and you just want to disable it when it is being installed from App Store.</p>
<p>Fortunately, it is easy to differentiate between App Store and Testflight installations in run-time and initialize Bugsee only when appropriate:</p>
<figure class="highlight"><table><tr><td class="gutter"><pre><div class="line">1</div><div class="line">2</div><div class="line">3</div><div class="line">4</div><div class="line">5</div><div class="line">6</div><div class="line">7</div><div class="line">8</div><div class="line">9</div><div class="line">10</div><div class="line">11</div></pre></td><td class="code"><pre><div class="line">- (<span class="built_in">BOOL</span>)application:(<span class="built_in">UIApplication</span> *)application</div><div class="line">    didFinishLaunchingWithOptions:(<span class="built_in">NSDictionary</span> *)launchOptions {</div><div class="line">    <span class="comment">// ...other initialization code</span></div><div class="line"></div><div class="line">    <span class="keyword">if</span> ([[[[<span class="built_in">NSBundle</span> mainBundle] appStoreReceiptURL] lastPathComponent] isEqualToString:<span class="string">@"sandboxReceipt"</span>]) {</div><div class="line">        <span class="comment">// We are in TestFlight, enable Bugsee!</span></div><div class="line">        [Bugsee launchWithToken:<span class="string">@"your app token"</span>];</div><div class="line">    }</div><div class="line"></div><div class="line">    <span class="keyword">return</span> <span class="literal">YES</span>;</div><div class="line">}</div></pre></td></tr></table></figure>

<h2 id="Debug_vs-_Release_vs-_Beta">Debug vs. Release vs. Beta</h2>
<p>In this setup you create and maintain three build flavors. Distribution method of the Beta flavor is not important, it can be done either through Ad-hoc distribution (see our <a href="/2016/08/28/iOS-Ad-hoc-distribution-using-Amazon-S3/">tutorial on building in house Ad-hoc distribution using S3</a>) or through TestFlight. In this setup you are back to detecting the configuration at compile. Adding an additional configuration, however, is a multi step process:</p>
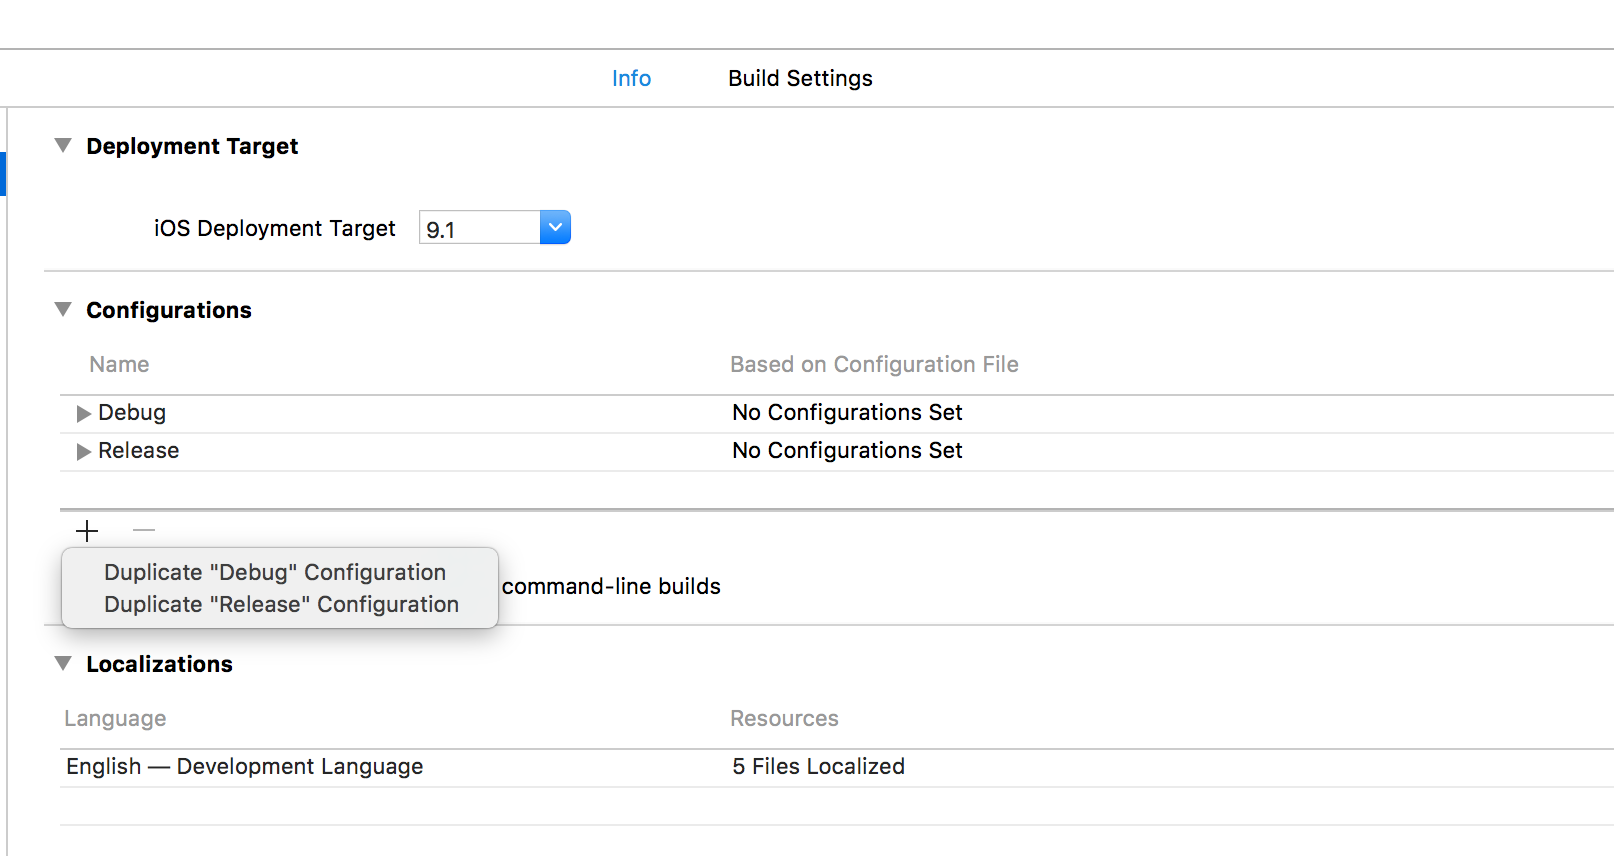
<p>Go to your project <strong>Info</strong>, and under <strong>Configurations</strong>, create a new one by duplicating the Release one.</p>
<p><img src="/images/build-config/create-configuration.png" alt=""></p>
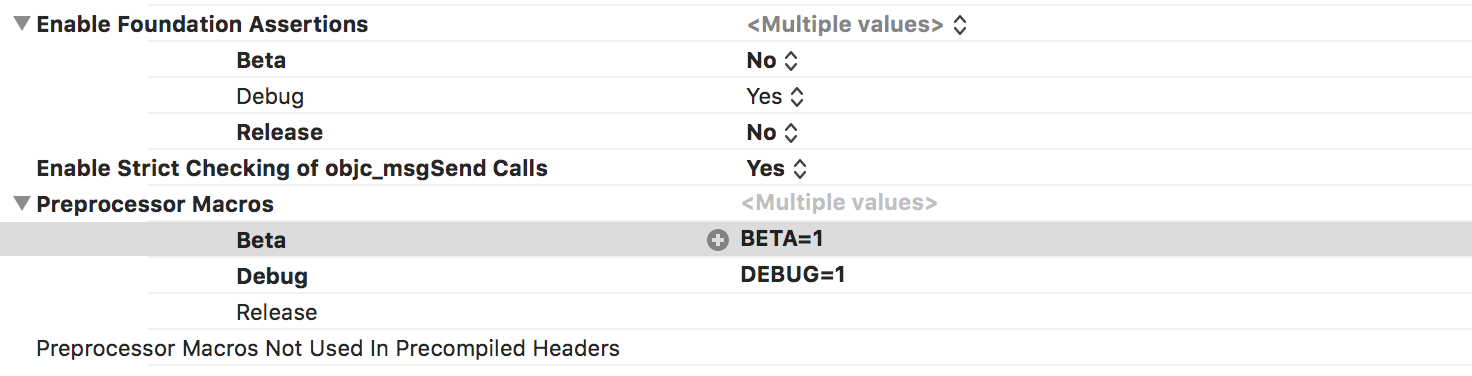
<p>Go to Build Settings and in Preprocessor Macros and add BETA=1 to that new Beta configuration (note that this is actually the place DEBUG=1 is being set for that Debug build).</p>
<p><img src="/images/build-config/add-macro.png" alt=""></p>
<p>Voila! You can now detect Release versus Beta build at compilation time. Other than the BETA flag, the builds are identical.</p>
<p>Let’s launch Bugsee in Debug and Beta only:</p>
<figure class="highlight"><table><tr><td class="gutter"><pre><div class="line">1</div><div class="line">2</div><div class="line">3</div><div class="line">4</div><div class="line">5</div><div class="line">6</div><div class="line">7</div><div class="line">8</div><div class="line">9</div><div class="line">10</div><div class="line">11</div><div class="line">12</div></pre></td><td class="code"><pre><div class="line"><span class="preprocessor">#if ( DEBUG || BETA)</span></div><div class="line"><span class="preprocessor">#import "Bugsee/Bugsee.h"</span></div><div class="line"><span class="preprocessor">#endif</span></div><div class="line"></div><div class="line">....</div><div class="line"></div><div class="line">- (BOOL)application:(UIApplication *)application</div><div class="line">    didFinishLaunchingWithOptions:(NSDictionary *)launchOptions {</div><div class="line">    <span class="comment">// ...other initialization code</span></div><div class="line"><span class="preprocessor">#if (DEBUG || BETA)</span></div><div class="line">    [Bugsee launchWithToken:@<span class="string">"your app token"</span>];</div><div class="line"><span class="preprocessor">#endif</span></div></pre></td></tr></table></figure>

<p>Let’s use that CocoaPods trick to install the library only in Debug and Beta builds:</p>
<figure class="highlight"><table><tr><td class="gutter"><pre><div class="line">1</div></pre></td><td class="code"><pre><div class="line">pod <span class="string">'Bugsee'</span>, <span class="symbol">:configurations</span> =&gt; [<span class="string">'Debug'</span>, <span class="string">'Beta'</span>]</div></pre></td></tr></table></figure>

<p>The only thing left to do is to build the Beta configuration.</p>
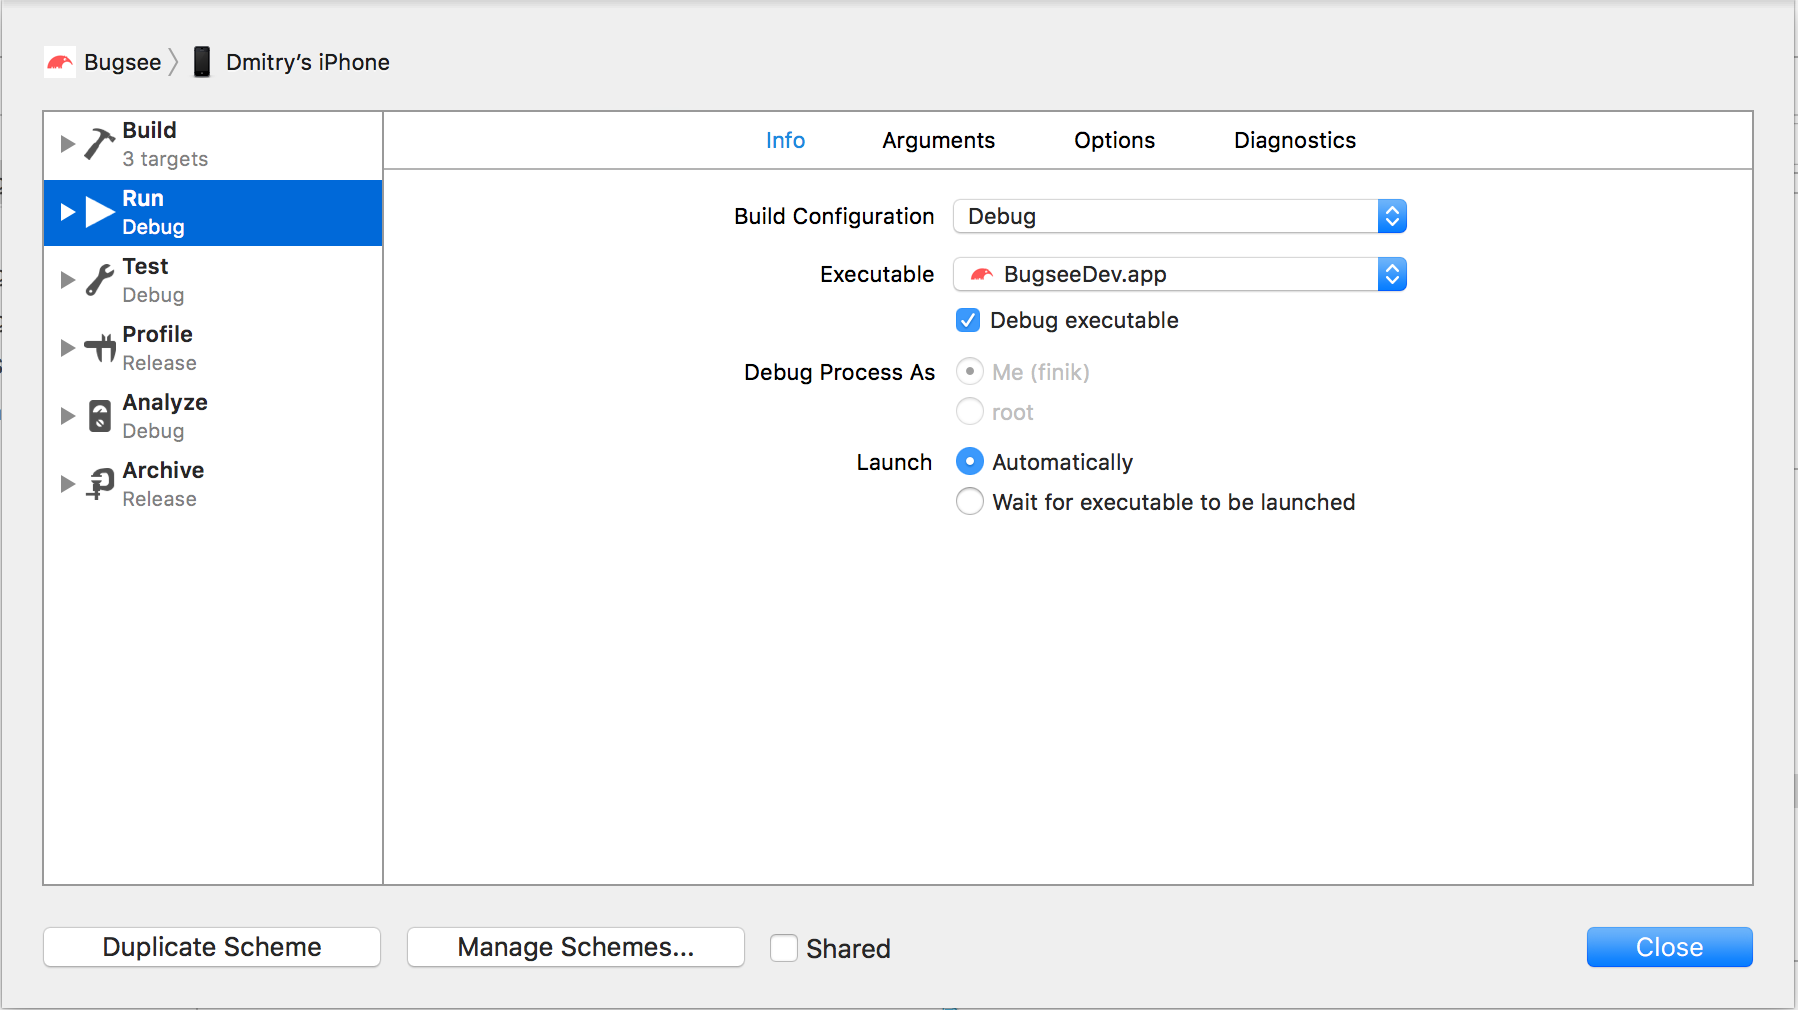
<p>First of all, go to <strong>Product-&gt;Schemes-&gt;Edit</strong> Scheme and click on Duplicate Scheme button. Name it properly (if your original scheme was called MyApp, call the new one MyApp Beta).</p>
<p><img src="/images/build-config/duplicate-scheme.png" alt=""></p>
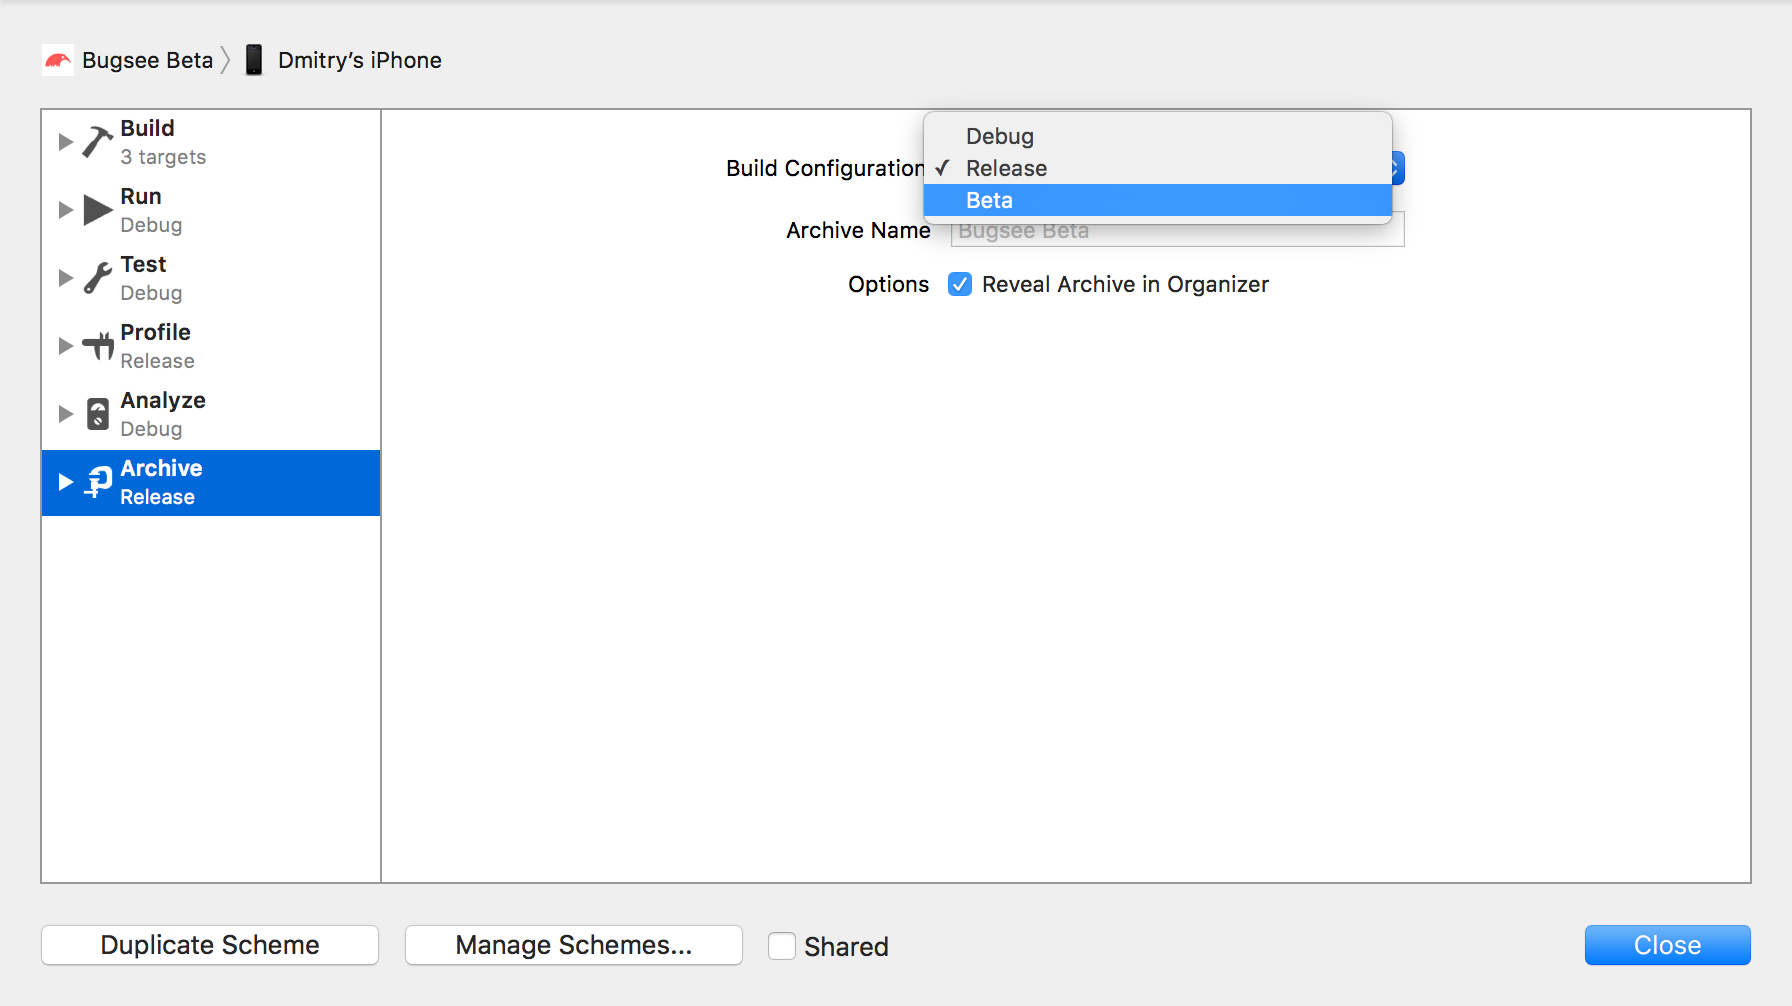
<p>Edit the new scheme, and change the configuration of the Archive step to use Beta configuration.</p>
<p><img src="/images/build-config/scheme-configuration.png" alt=""></p>
<p>That’s it. Now you have two schemes, one for Appstore and one for Beta releases. As long as you are developing and using <strong>Build &amp; Run</strong>, they are identical, and it doesn’t matter which one you are using. It matters though when you do <strong>Archive</strong>, depending whether you want to produce and IPA for App Store or Ad-Hoc, remember to switch to the right one.</p>
]]></content>
    <summary type="html">
    <![CDATA[<h2 id="Why?">Why?</h2>
<p>Applications today are rarely being built without 3rd party libraries and SDKs. There are libraries for integrati]]>
    </summary>
    
      <category term="ios, build, tesflight" scheme="http://finik.net/tags/ios-build-tesflight/"/>
    
  </entry>
  
  <entry>
    <title><![CDATA[iOS Ad-hoc distribution using Amazon S3]]></title>
    <link href="http://finik.net/2016/08/28/iOS-Ad-hoc-distribution-using-Amazon-S3/"/>
    <id>http://finik.net/2016/08/28/iOS-Ad-hoc-distribution-using-Amazon-S3/</id>
    <published>2016-08-29T04:50:35.000Z</published>
    <updated>2017-12-16T06:24:42.815Z</updated>
    <content type="html"><![CDATA[<h2 id="Why?">Why?</h2>
<p>Every iOS developer at some point in their life is challenged with a task to distribute their awesome app to a group of loyal beta testers. Apple does not make it easy. The reasons for this are clear. We all care about security and greatly appreciate the fact that iOS platform is much more secure than its main competitor, but it is still a problem that needs to be solved.  There are services out there that try to automate the ad-hoc distribution process, but sometimes it is not desirable or even possible to use them. Thus, there is a need to bake an in-house distribution system.</p>
<p>To make the ad-hoc distribution work, one must:</p>
<ul>
<li>Upload the IPA file to a place where it can be downloaded</li>
<li>Generate a special plist xml file, referring to the IPA above. This file must be accessible over https!</li>
<li>Generate an html file with a special <strong>Download</strong> link, pointing to the plist file above. This is the page users will see</li>
</ul>
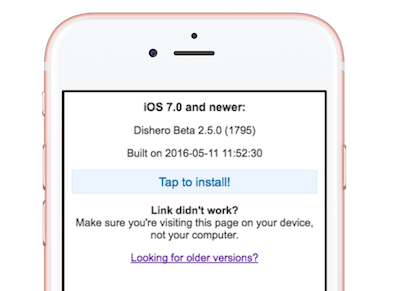
<p>Throughout this tutorial, we are going to use an application called Dishero as an example. We will host it directly on S3, without spinning up machines or configuring http servers. The result will look similar to this:</p>
<p><img src="/images/s3-ad-hoc/iphone.png" alt=""></p>
<p>We will produce a nice webpage, hosted on S3 that will provide details and a one-click install for our application.</p>
<h2 id="Prerequisites">Prerequisites</h2>
<h3 id="Create_an_Ad-hoc_distribution_profile">Create an Ad-hoc distribution profile</h3>
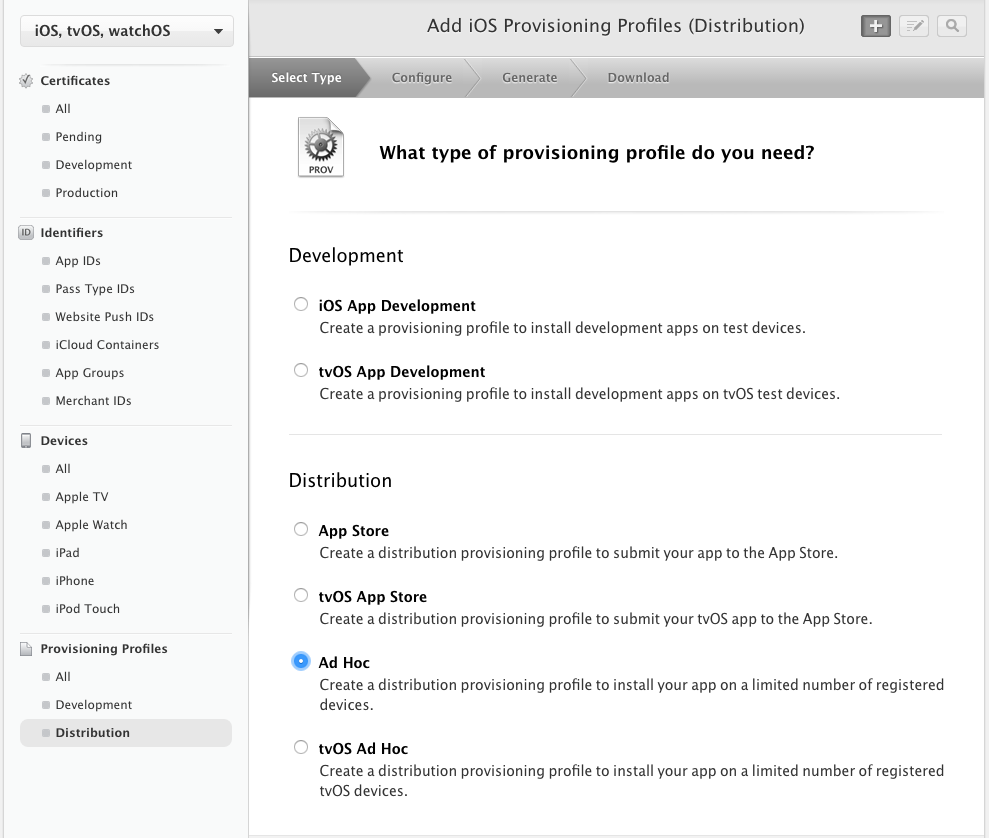
<p>First of all you will need to create a distribution profiles in iTunes Connect.</p>
<p>Ad-Hoc distribution limits the the ability to install your application only on specific devices that have to be pre-registered. Instruct your beta users to visit <a href="http://whatsmyudid.com/" target="_blank" rel="external">http://whatsmyudid.com/</a> and to follow the instructions there to obtain UDID (Unique Device ID) for their device and send it to you.</p>
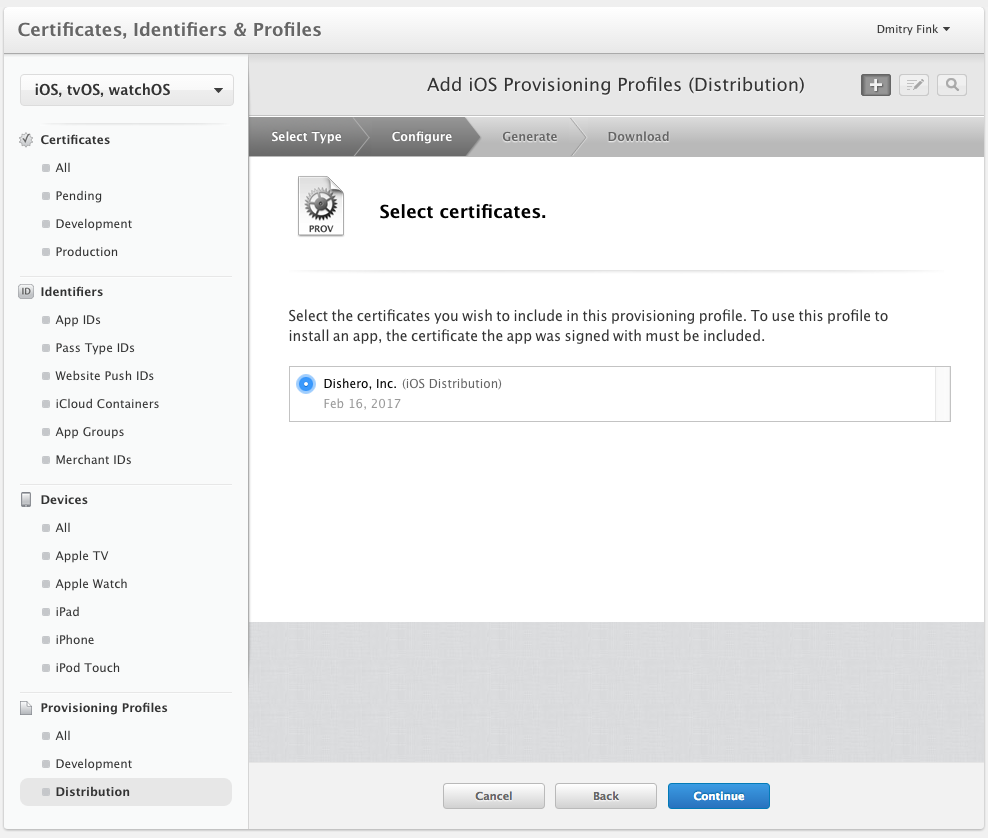
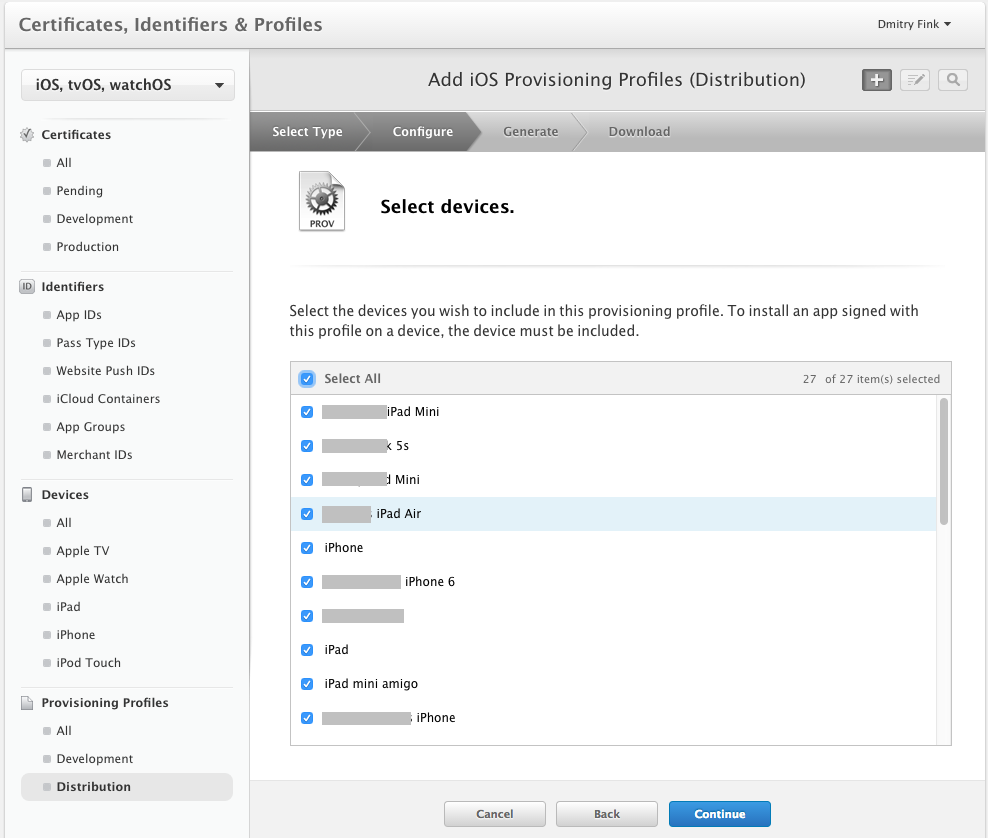
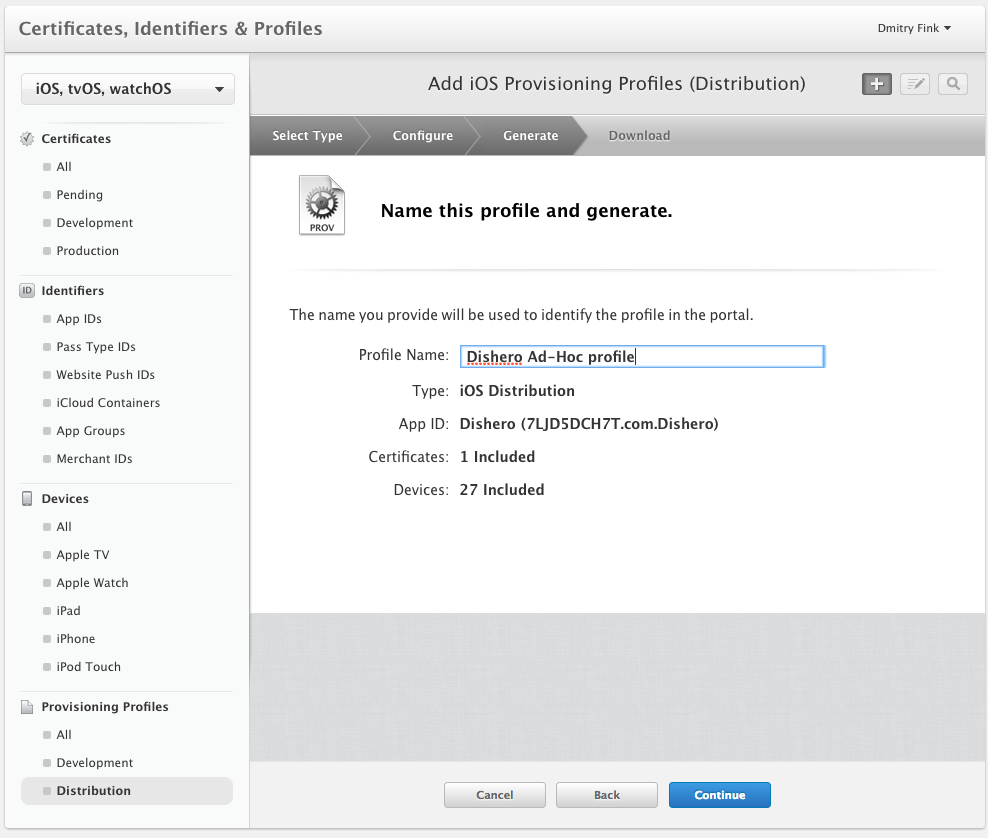
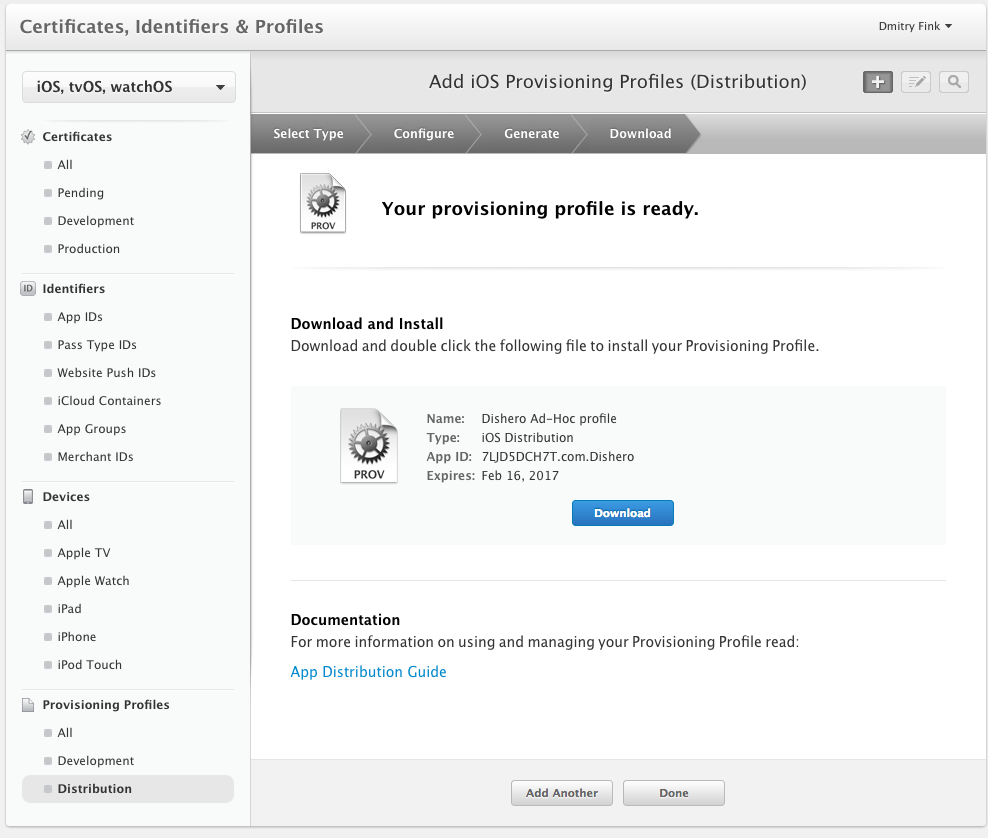
<p>Follow the pictures below to create an Ad-Hoc provisioning profile, and add all the devices to it. Download it once ready and install in your local keychain by double-clicking on it.</p>
<p><img src="/images/s3-ad-hoc/step1.png" alt=""><br><img src="/images/s3-ad-hoc/step2.png" alt=""><br><img src="/images/s3-ad-hoc/step3.png" alt=""><br><img src="/images/s3-ad-hoc/step4.png" alt=""><br><img src="/images/s3-ad-hoc/step5.png" alt=""></p>
<h3 id="Create_a_bucket_on_S3_and_enable_web_hosting_on_it">Create a bucket on S3 and enable web hosting on it</h3>
<p>You will also need a dedicated bucket on S3 for this. Make sure you enable Web Hosting on your bucket as shown in the picture below.<br><strong>Bonus</strong>: If you want to have your download page to be at a nice URL (we are using download.dishero.com for this example), you have to do a few tricks:</p>
<ol>
<li>Name your bucket accordingly - <strong>download.dishero.com</strong></li>
<li>In your DNS, configure a CNAME record <strong>download.dishero.com</strong> to point to <strong>download.dishero.com</strong>.s3.amazonaws.com.</li>
</ol>
<h3 id="Install_S3cmd">Install S3cmd</h3>
<p>We will need <a href="http://s3tools.org/" target="_blank" rel="external">s3cmd</a> to upload the files to S3 and set the right permissions.</p>
<p>Installing it using <a href="http://brew.sh/" target="_blank" rel="external">homebrew</a> is easy:</p>
<figure class="highlight"><table><tr><td class="gutter"><pre><div class="line">1</div></pre></td><td class="code"><pre><div class="line">brew <span class="operator"><span class="keyword">install</span> s3cmd</span></div></pre></td></tr></table></figure>

<p>So is installing it using python’s pip:</p>
<figure class="highlight"><table><tr><td class="gutter"><pre><div class="line">1</div></pre></td><td class="code"><pre><div class="line"><span class="built_in">sudo</span> pip install s3cmd</div></pre></td></tr></table></figure>

<p>…or you can just follow the manual process described on s3cmd website.</p>
<p>Once you have it installed, run it</p>
<figure class="highlight"><table><tr><td class="gutter"><pre><div class="line">1</div></pre></td><td class="code"><pre><div class="line"><span class="comment">s3cmd</span> <span class="literal">-</span><span class="literal">-</span><span class="comment">configure</span></div></pre></td></tr></table></figure>

<p>and enter your AWS credentials when prompted. Credentials will be saved and we won’t need to state them explicitly anymore.</p>
<h2 id="Where_the_magic_happens">Where the magic happens</h2>
<p>The script below does all the heavy lifting. It generates index.html, proper plist file and uploads them along with the IPA itself to S3.</p>
<figure class="highlight"><table><tr><td class="gutter"><pre><div class="line">1</div><div class="line">2</div><div class="line">3</div><div class="line">4</div><div class="line">5</div><div class="line">6</div><div class="line">7</div><div class="line">8</div><div class="line">9</div><div class="line">10</div><div class="line">11</div><div class="line">12</div><div class="line">13</div><div class="line">14</div><div class="line">15</div><div class="line">16</div><div class="line">17</div><div class="line">18</div><div class="line">19</div><div class="line">20</div><div class="line">21</div><div class="line">22</div><div class="line">23</div><div class="line">24</div><div class="line">25</div><div class="line">26</div><div class="line">27</div><div class="line">28</div><div class="line">29</div><div class="line">30</div><div class="line">31</div><div class="line">32</div><div class="line">33</div><div class="line">34</div><div class="line">35</div><div class="line">36</div><div class="line">37</div><div class="line">38</div><div class="line">39</div><div class="line">40</div><div class="line">41</div><div class="line">42</div><div class="line">43</div><div class="line">44</div><div class="line">45</div><div class="line">46</div><div class="line">47</div><div class="line">48</div><div class="line">49</div><div class="line">50</div><div class="line">51</div><div class="line">52</div><div class="line">53</div><div class="line">54</div><div class="line">55</div><div class="line">56</div><div class="line">57</div><div class="line">58</div><div class="line">59</div><div class="line">60</div><div class="line">61</div><div class="line">62</div><div class="line">63</div><div class="line">64</div><div class="line">65</div><div class="line">66</div><div class="line">67</div><div class="line">68</div><div class="line">69</div><div class="line">70</div><div class="line">71</div><div class="line">72</div><div class="line">73</div><div class="line">74</div><div class="line">75</div><div class="line">76</div><div class="line">77</div><div class="line">78</div><div class="line">79</div><div class="line">80</div><div class="line">81</div><div class="line">82</div><div class="line">83</div><div class="line">84</div><div class="line">85</div><div class="line">86</div><div class="line">87</div><div class="line">88</div></pre></td><td class="code"><pre><div class="line"><span class="xml">#!/bin/bash</span></div><div class="line">set -e</div><div class="line"></div><div class="line">PROJECT="Dishero"</div><div class="line">FILE=$1</div><div class="line">TARGET=$2</div><div class="line">VERSION=$3</div><div class="line">BUILD=$4</div><div class="line">BUILD_TIME=`stat -f "%Sm" -t "%Y-%m-%d %H:%M:%S" $1`</div><div class="line">SECURE_TARGET="https://s3-us-west-2.amazonaws.com/${TARGET}"</div><div class="line"></div><div class="line">echo "Generating ${PROJECT}-${VERSION}-${BUILD}.plist"</div><div class="line">cat &gt; ./${PROJECT}-${VERSION}-${BUILD}.plist <span class="tag">&lt;&lt;<span class="attribute">PLIST_DELIM</span></span></div><div class="line">&lt;?<span class="attribute">xml</span> <span class="attribute">version</span>=<span class="value">"1.0"</span> <span class="attribute">encoding</span>=<span class="value">"UTF-8"</span><span class="value">?</span>&gt;</div><div class="line"><span class="doctype">&lt;!DOCTYPE plist PUBLIC "-//Apple//DTD PLIST 1.0//EN" "http://www.apple.com/DTDs/PropertyList-1.0.dtd"&gt;</span></div><div class="line"><span class="tag">&lt;<span class="title">plist</span> <span class="attribute">version</span>=<span class="value">"1.0"</span>&gt;</span></div><div class="line"><span class="tag">&lt;<span class="title">dict</span>&gt;</span></div><div class="line"> <span class="tag">&lt;<span class="title">key</span>&gt;</span>items<span class="tag">&lt;/<span class="title">key</span>&gt;</span></div><div class="line"> <span class="tag">&lt;<span class="title">array</span>&gt;</span></div><div class="line"> </div><div class="line">  <span class="tag">&lt;<span class="title">dict</span>&gt;</span></div><div class="line">   <span class="tag">&lt;<span class="title">key</span>&gt;</span>assets<span class="tag">&lt;/<span class="title">key</span>&gt;</span></div><div class="line">   <span class="tag">&lt;<span class="title">array</span>&gt;</span></div><div class="line">    <span class="tag">&lt;<span class="title">dict</span>&gt;</span></div><div class="line">     <span class="tag">&lt;<span class="title">key</span>&gt;</span>kind<span class="tag">&lt;/<span class="title">key</span>&gt;</span></div><div class="line">     <span class="tag">&lt;<span class="title">string</span>&gt;</span>software-package<span class="tag">&lt;/<span class="title">string</span>&gt;</span></div><div class="line">     <span class="tag">&lt;<span class="title">key</span>&gt;</span>url<span class="tag">&lt;/<span class="title">key</span>&gt;</span></div><div class="line">     <span class="tag">&lt;<span class="title">string</span>&gt;</span>http://${TARGET}/${PROJECT}-${VERSION}-${BUILD}.ipa<span class="tag">&lt;/<span class="title">string</span>&gt;</span></div><div class="line">    <span class="tag">&lt;/<span class="title">dict</span>&gt;</span></div><div class="line">   <span class="tag">&lt;/<span class="title">array</span>&gt;</span></div><div class="line">  </div><div class="line">   <span class="tag">&lt;<span class="title">key</span>&gt;</span>metadata<span class="tag">&lt;/<span class="title">key</span>&gt;</span></div><div class="line">   <span class="tag">&lt;<span class="title">dict</span>&gt;</span></div><div class="line">    <span class="tag">&lt;<span class="title">key</span>&gt;</span>bundle-identifier<span class="tag">&lt;/<span class="title">key</span>&gt;</span></div><div class="line">    <span class="tag">&lt;<span class="title">string</span>&gt;</span>${BUNDLE}<span class="tag">&lt;/<span class="title">string</span>&gt;</span></div><div class="line">    <span class="tag">&lt;<span class="title">key</span>&gt;</span>bundle-version<span class="tag">&lt;/<span class="title">key</span>&gt;</span></div><div class="line">    <span class="tag">&lt;<span class="title">string</span>&gt;</span>${VERSION}<span class="tag">&lt;/<span class="title">string</span>&gt;</span></div><div class="line">    <span class="tag">&lt;<span class="title">key</span>&gt;</span>kind<span class="tag">&lt;/<span class="title">key</span>&gt;</span></div><div class="line">    <span class="tag">&lt;<span class="title">string</span>&gt;</span>software<span class="tag">&lt;/<span class="title">string</span>&gt;</span></div><div class="line">    <span class="tag">&lt;<span class="title">key</span>&gt;</span>subtitle<span class="tag">&lt;/<span class="title">key</span>&gt;</span></div><div class="line">    <span class="tag">&lt;<span class="title">string</span>&gt;</span>${PROJECT}<span class="tag">&lt;/<span class="title">string</span>&gt;</span></div><div class="line">    <span class="tag">&lt;<span class="title">key</span>&gt;</span>title<span class="tag">&lt;/<span class="title">key</span>&gt;</span></div><div class="line">    <span class="tag">&lt;<span class="title">string</span>&gt;</span>${PROJECT}<span class="tag">&lt;/<span class="title">string</span>&gt;</span></div><div class="line">   <span class="tag">&lt;/<span class="title">dict</span>&gt;</span></div><div class="line"> </div><div class="line">  <span class="tag">&lt;/<span class="title">dict</span>&gt;</span></div><div class="line"> <span class="tag">&lt;/<span class="title">array</span>&gt;</span></div><div class="line"><span class="tag">&lt;/<span class="title">dict</span>&gt;</span></div><div class="line"><span class="tag">&lt;/<span class="title">plist</span>&gt;</span></div><div class="line"></div><div class="line">PLIST_DELIM</div><div class="line"></div><div class="line">echo "Generating index.html"</div><div class="line">cat &gt; ./index.html <span class="tag">&lt;&lt;<span class="attribute">INDEX_DELIM</span></span></div><div class="line">&lt;!<span class="attribute">DOCTYPE</span> <span class="attribute">html</span> <span class="attribute">PUBLIC</span> "<span class="attribute">-</span>//<span class="attribute">W3C</span>//<span class="attribute">DTD</span> <span class="attribute">XHTML</span> <span class="attribute">1.0</span> <span class="attribute">Transitional</span>//<span class="attribute">EN</span>" "<span class="attribute">http:</span>//<span class="attribute">www.w3.org</span>/<span class="attribute">TR</span>/<span class="attribute">xhtml1</span>/<span class="attribute">DTD</span>/<span class="attribute">xhtml1-transitional.dtd</span>"&gt;</div><div class="line"><span class="tag">&lt;<span class="title">html</span> <span class="attribute">xmlns</span>=<span class="value">"http://www.w3.org/1999/xhtml"</span>&gt;</span></div><div class="line"><span class="tag">&lt;<span class="title">head</span>&gt;</span></div><div class="line"><span class="tag">&lt;<span class="title">meta</span> <span class="attribute">http-equiv</span>=<span class="value">"Content-Type"</span> <span class="attribute">content</span>=<span class="value">"text/html; charset=UTF-8"</span> /&gt;</span></div><div class="line"><span class="tag">&lt;<span class="title">meta</span> <span class="attribute">name</span>=<span class="value">"viewport"</span> <span class="attribute">content</span>=<span class="value">"width=device-width, initial-scale=1.0, maximum-scale=1.0, user-scalable=0"</span>&gt;</span></div><div class="line"><span class="tag">&lt;<span class="title">title</span>&gt;</span>${PROJECT} ${VERSION} (${BUILD})<span class="tag">&lt;/<span class="title">title</span>&gt;</span></div><div class="line"><span class="tag">&lt;<span class="title">style</span> <span class="attribute">type</span>=<span class="value">"text/css"</span>&gt;</span><span class="css"></span></div><div class="line"><span class="tag">body</span> <span class="rules">{<span class="rule"><span class="attribute">background</span>:<span class="value"><span class="hexcolor">#fff</span></span></span>;<span class="rule"><span class="attribute">margin</span>:<span class="value"><span class="number">0</span></span></span>;<span class="rule"><span class="attribute">padding</span>:<span class="value"><span class="number">0</span></span></span>;<span class="rule"><span class="attribute">font-family</span>:<span class="value">arial,helvetica,sans-serif</span></span>;<span class="rule"><span class="attribute">text-align</span>:<span class="value">center</span></span>;<span class="rule"><span class="attribute">padding</span>:<span class="value"><span class="number">10px</span></span></span>;<span class="rule"><span class="attribute">color</span>:<span class="value"><span class="hexcolor">#333</span></span></span>;<span class="rule"><span class="attribute">font-size</span>:<span class="value"><span class="number">16px</span></span></span>;<span class="rule">}</span></span></div><div class="line"><span class="id">#container</span> <span class="rules">{<span class="rule"><span class="attribute">width</span>:<span class="value"><span class="number">300px</span></span></span>;<span class="rule"><span class="attribute">margin</span>:<span class="value"><span class="number">0</span> auto</span></span>;<span class="rule">}</span></span></div><div class="line"><span class="tag">h1</span> <span class="rules">{<span class="rule"><span class="attribute">margin</span>:<span class="value"><span class="number">0</span></span></span>;<span class="rule"><span class="attribute">padding</span>:<span class="value"><span class="number">0</span></span></span>;<span class="rule"><span class="attribute">font-size</span>:<span class="value"><span class="number">14px</span></span></span>;<span class="rule">}</span></span></div><div class="line"><span class="tag">p</span> <span class="rules">{<span class="rule"><span class="attribute">font-size</span>:<span class="value"><span class="number">13px</span></span></span>;<span class="rule">}</span></span></div><div class="line"><span class="class">.link</span> <span class="rules">{<span class="rule"><span class="attribute">background</span>:<span class="value"><span class="hexcolor">#ecf5ff</span></span></span>;<span class="rule"><span class="attribute">border-top</span>:<span class="value"><span class="number">1px</span> solid <span class="hexcolor">#fff</span></span></span>;<span class="rule"><span class="attribute">border</span>:<span class="value"><span class="number">1px</span> solid <span class="hexcolor">#dfebf8</span></span></span>;<span class="rule"><span class="attribute">margin-top</span>:<span class="value">.<span class="number">5em</span></span></span>;<span class="rule"><span class="attribute">padding</span>:<span class="value">.<span class="number">3em</span></span></span>;<span class="rule">}</span></span></div><div class="line"><span class="class">.link</span> <span class="tag">a</span> <span class="rules">{<span class="rule"><span class="attribute">text-decoration</span>:<span class="value">none</span></span>;<span class="rule"><span class="attribute">font-size</span>:<span class="value"><span class="number">15px</span></span></span>;<span class="rule"><span class="attribute">display</span>:<span class="value">block</span></span>;<span class="rule"><span class="attribute">color</span>:<span class="value"><span class="hexcolor">#069</span></span></span>;<span class="rule">}</span></span></div><div class="line"><span class="class">.warning</span> <span class="rules">{<span class="rule"><span class="attribute">font-size</span>:<span class="value"> <span class="number">12px</span></span></span>; <span class="rule"><span class="attribute">color</span>:<span class="value"><span class="hexcolor">#F00</span></span></span>; <span class="rule"><span class="attribute">font-weight</span>:<span class="value">bold</span></span>; <span class="rule"><span class="attribute">margin</span>:<span class="value"><span class="number">10px</span> <span class="number">0px</span></span></span>;<span class="rule">}</span></span></div><div class="line"><span class="tag">&lt;/<span class="title">style</span>&gt;</span></div><div class="line"><span class="tag">&lt;/<span class="title">head</span>&gt;</span></div><div class="line"></div><div class="line"><span class="tag">&lt;<span class="title">body</span>&gt;</span></div><div class="line"><span class="tag">&lt;<span class="title">div</span> <span class="attribute">id</span>=<span class="value">"container"</span>&gt;</span></div><div class="line"><span class="tag">&lt;<span class="title">h1</span>&gt;</span>iOS 7.0 and newer:<span class="tag">&lt;/<span class="title">h1</span>&gt;</span></div><div class="line"><span class="tag">&lt;<span class="title">p</span>&gt;</span>${PROJECT} Beta ${VERSION} (${BUILD})<span class="tag">&lt;/<span class="title">p</span>&gt;</span></div><div class="line"><span class="tag">&lt;<span class="title">p</span>&gt;</span>Built on ${BUILD_TIME}<span class="tag">&lt;/<span class="title">p</span>&gt;</span></div><div class="line"><span class="tag">&lt;<span class="title">div</span> <span class="attribute">class</span>=<span class="value">"link"</span>&gt;</span><span class="tag">&lt;<span class="title">a</span> <span class="attribute">href</span>=<span class="value">"itms-services://?action=download-manifest;url=${SECURE_TARGET}/${PROJECT}-${VERSION}-${BUILD}.plist"</span>&gt;</span>Tap to install!<span class="tag">&lt;/<span class="title">a</span>&gt;</span><span class="tag">&lt;/<span class="title">div</span>&gt;</span></div><div class="line"><span class="tag">&lt;<span class="title">p</span>&gt;</span><span class="tag">&lt;<span class="title">strong</span>&gt;</span>Link didn't work?<span class="tag">&lt;/<span class="title">strong</span>&gt;</span><span class="tag">&lt;<span class="title">br</span> /&gt;</span>Make sure you're visiting this page on your device, not your computer.<span class="tag">&lt;/<span class="title">p</span>&gt;</span></div><div class="line"><span class="tag">&lt;/<span class="title">body</span>&gt;</span></div><div class="line"><span class="tag">&lt;/<span class="title">html</span>&gt;</span></div><div class="line">INDEX_DELIM</div><div class="line"></div><div class="line">echo "Uploading ${PROJECT}-${VERSION}-${BUILD}.ipa to s3://${TARGET}"</div><div class="line">s3cmd put -P $FILE s3://${TARGET}/${PROJECT}-${VERSION}-${BUILD}.ipa</div><div class="line">echo "Uploading ${PROJECT}-${VERSION}-${BUILD}.plist to s3://${TARGET}"</div><div class="line">s3cmd put -P ${PROJECT}-${VERSION}-${BUILD}.plist s3://${TARGET}/${PROJECT}-${VERSION}-${BUILD}.plist</div><div class="line">echo "Uploading index.html to s3://${TARGET}"</div><div class="line">s3cmd put -P index.html s3://${TARGET}/</div></pre></td></tr></table></figure>

<p>Executing the script requires only a few parameters: an IPA file, a bucket path, a version and a build</p>
<figure class="highlight"><table><tr><td class="gutter"><pre><div class="line">1</div><div class="line">2</div></pre></td><td class="code"><pre><div class="line"><span class="preprocessor"># $PATH_TO_SCRIPT/upload_to_s3.sh <span class="title">&lt;IPA_FILE&gt;</span> <span class="title">&lt;TARGET_PATH&gt;</span> <span class="title">&lt;VERSION&gt;</span> <span class="title">&lt;BUILD&gt;</span></span></div><div class="line">$PATH_TO_SCRIPT/upload_to_s3<span class="variable">.sh</span> Dishero<span class="variable">.ipa</span> download<span class="variable">.dishero</span><span class="variable">.com</span>/beta <span class="number">2.5</span><span class="number">.0</span> <span class="number">1795</span></div></pre></td></tr></table></figure>

<p>The command above will make the download page available at <a href="http://download.dishero.com/beta" target="_blank" rel="external">http://download.dishero.com/beta</a>. Alternatively, if DNS is not under your control and you can’t do CNAME tricks to get a proper hostname, you will have to point your users to <a href="https://s3-us-west-2.amazonaws.com/bucketname/path/" target="_blank" rel="external">https://s3-us-west-2.amazonaws.com/bucketname/path/</a></p>
]]></content>
    <summary type="html">
    <![CDATA[<h2 id="Why?">Why?</h2>
<p>Every iOS developer at some point in their life is challenged with a task to distribute their awesome app to a gr]]>
    </summary>
    
      <category term="aws, build, ios" scheme="http://finik.net/tags/aws-build-ios/"/>
    
  </entry>
  
  <entry>
    <title><![CDATA[Typing bidi text]]></title>
    <link href="http://finik.net/2014/10/30/bidi/"/>
    <id>http://finik.net/2014/10/30/bidi/</id>
    <published>2014-10-31T05:17:42.000Z</published>
    <updated>2014-10-31T05:19:38.000Z</updated>
    <content type="html"><![CDATA[<p>I feel stupid asking it, but where can I learn that sacral secret knowledge of typing hebrew text mixed with english, numbers and punctuation using modern editors and operating systems? Oh, and after typing, being able to copy-paste it to another app/window while preserving the right order of elements in a sentence. I can’t remember the last time I did that, I think the most popular text editor in Israel was called Einstein back then and copy-paste hasn’t been discovered by humanity yet, in any case I can’t seem to be able to do it now, no matter what I try. All I need is to type two short sentences.</p>
]]></content>
    <summary type="html">
    <![CDATA[<p>I feel stupid asking it, but where can I learn that sacral secret knowledge of typing hebrew text mixed with english, numbers and punctua]]>
    </summary>
    
      <category term="bidi" scheme="http://finik.net/tags/bidi/"/>
    
      <category term="hebrew" scheme="http://finik.net/tags/hebrew/"/>
    
      <category term="rant" scheme="http://finik.net/tags/rant/"/>
    
  </entry>
  
  <entry>
    <title><![CDATA[NGINX rewrites on Amazon Elastic Beanstalk]]></title>
    <link href="http://finik.net/2014/10/29/Beanstalk/"/>
    <id>http://finik.net/2014/10/29/Beanstalk/</id>
    <published>2014-10-30T05:33:15.000Z</published>
    <updated>2014-10-30T09:11:47.000Z</updated>
    <content type="html"><![CDATA[<p>We are running most of our backend code at <a href="https://www.dishero.com" target="_blank" rel="external">Dishero</a> on Amazon Elastic Beanstalk and it has been great so far. With Elastic Beanstalk we don’t need to worry about provisoning new instances and auto-scaling, in most cases it just allows us to upload our app and ELB takes care of the rest, however in some rare cases when we actually want to tinker with the internals and do some changes to the actual container it appears to be non-trivial and sometimes takes time to figure out.</p>
<h2 id="Typical_ELB_setup">Typical ELB setup</h2>
<p>In a typical auto-scaled ELB setup, we have one elastic load balancer and multiple instances that execute our code. The setup is as follows:</p>
<ul>
<li>Elastic Load Balancer is the one that is terminating the SSL connection, traffic to our instances is pure HTTP over port 80. You can find out more about setting up SSL certificates on Elastic Beanstalk <a href="http://docs.aws.amazon.com/elasticbeanstalk/latest/dg/configuring-https.html" target="_blank" rel="external">here</a>.</li>
<li>The instances are configured to forward all traffic from port 80 to 8080 using iptables.</li>
<li>Each instance has an NGINX running, which is listening on port 80880 and forwarding the traffic to our actual Node applicaiton.</li>
</ul>
<h2 id="The_problem">The problem</h2>
<p>We want to configure nginx to redirect all non-https traffic to https, and while we are at it to redirect all non-www traffic to www (i.e always push users to <a href="https://www.example.com/" target="_blank" rel="external">https://www.example.com/</a>…).</p>
<ul>
<li>It would be nice also to serve these as one redirect, taking a naive approach and writing two different rules (one for www and one for https) might result in two sequential redirects.</li>
<li>Since we are running the same configuration on multiple configurations which have different base URLs, we do not want to hardcode the actual URLs in the actual rulesm but rather keep them generic.</li>
</ul>
<h2 id="The_solution">The solution</h2>
<p>After several unsuccessfull iterations we arrived at the following set of rules:</p>
<figure class="highlight"><table><tr><td class="gutter"><pre><div class="line">1</div><div class="line">2</div><div class="line">3</div><div class="line">4</div><div class="line">5</div><div class="line">6</div><div class="line">7</div><div class="line">8</div><div class="line">9</div><div class="line">10</div><div class="line">11</div><div class="line">12</div><div class="line">13</div><div class="line">14</div><div class="line">15</div><div class="line">16</div><div class="line">17</div><div class="line">18</div><div class="line">19</div><div class="line">20</div><div class="line">21</div><div class="line">22</div></pre></td><td class="code"><pre><div class="line"><span class="title">set</span> <span class="variable">$fixedWWW</span> <span class="string">''</span>;</div><div class="line"><span class="title">set</span> <span class="variable">$needRedir</span> <span class="number">0</span>;</div><div class="line"></div><div class="line"><span class="comment"># nginx does not allow nested if statements</span></div><div class="line"></div><div class="line"><span class="comment"># check and decide on adding www prefix</span></div><div class="line"><span class="title">if</span> (<span class="variable">$host</span> !<span class="regexp">~* ^www(.*))</span> {</div><div class="line">	<span class="title">set</span> <span class="variable">$fixedWWW</span> <span class="string">'www.'</span>;</div><div class="line">	<span class="title">set</span> <span class="variable">$needRedir</span> <span class="number">1</span>;</div><div class="line">}</div><div class="line"></div><div class="line"><span class="comment"># what about that https? the traffic is all http right now</span></div><div class="line"><span class="comment"># but elastic load balancer tells us about the original scheme</span></div><div class="line"><span class="comment"># using $http_x_forwarded_proto variable</span></div><div class="line"><span class="title">if</span> (<span class="variable">$http_x_forwarded_proto</span> != <span class="string">'https'</span>) {</div><div class="line">	<span class="title">set</span> <span class="variable">$needRedir</span> <span class="number">1</span>;</div><div class="line">}</div><div class="line"></div><div class="line"><span class="comment"># ok, so whats the verdict, do we need to redirect?</span></div><div class="line"><span class="title">if</span> (<span class="variable">$needRedir</span> = <span class="number">1</span>) {</div><div class="line">	<span class="title">rewrite</span><span class="regexp"> ^(.*)</span> <span class="url">https://$fixedWWW$host$1</span> <span class="built_in">redirect</span>;</div><div class="line">}</div></pre></td></tr></table></figure>


<p>So the question is where should we put it?</p>
<p>The file that configures nginx to proxy traffic from 8080 to the application in the Elastic Beanstalk environment is located at <strong>/etc/nginx/conf.d/00_elastic_beanstalk_proxy.conf</strong></p>
<p>Obviously, SSH’ing to all the instances, modifying the file and restarting nginx manually is of no use, it will get overwritten next time the app is deployed and newly deployed instances won’t have the changes either.<br>Luckily for us Beanstalk allows us to customize the EC2 environment it provisions using <a href="http://docs.aws.amazon.com/elasticbeanstalk/latest/dg/customize-containers-ec2.html" target="_blank" rel="external">configuration files</a>, that system is pretty flexible and allows not only to install yum packages, write and overwrite files in the system, but to run commands and shell scripts during app deployments as well.</p>
<p>We may be tempted to use the config files to overwrite the <strong>00_elastic_beanstalk_proxy.conf</strong> file in <strong>/etc/nginx/conf.d</strong> directly, and then wonder where are our changes and why they are nowhere to be seen in the system. Actually it might work well if all we want is add new nginx configuration files, but the issue is with existing nginx files, during the deployment process, the customization stage happens <strong>before</strong> nginx default files are being installed into their by the Elastic Beanstalk system, so even if we set up our copy of <strong>00_elastic_beanstalk_proxy.conf</strong>, moments later it will still be overwritten with the default one. We need to overwrite that default one instead, and the source location of these is <strong>/tmp/deployment/config/</strong>, the one we are mostly interested in is suprisingly named  <strong>#etc#nginx#conf.d#00_elastic_beanstalk_proxy.conf</strong> </p>
<p>So eventually, after all the trial and error, the solution appears to be quite simple, the one thing that needs to be added to our project is the following nginx.config file inside our .ebextensions folder:</p>
<figure class="highlight yaml"><figcaption><span>.ebextensions/nginx.config</span></figcaption><table><tr><td class="gutter"><pre><div class="line">1</div><div class="line">2</div><div class="line">3</div><div class="line">4</div><div class="line">5</div><div class="line">6</div><div class="line">7</div><div class="line">8</div><div class="line">9</div><div class="line">10</div><div class="line">11</div><div class="line">12</div><div class="line">13</div><div class="line">14</div><div class="line">15</div><div class="line">16</div><div class="line">17</div><div class="line">18</div><div class="line">19</div><div class="line">20</div><div class="line">21</div><div class="line">22</div><div class="line">23</div><div class="line">24</div><div class="line">25</div><div class="line">26</div><div class="line">27</div><div class="line">28</div><div class="line">29</div><div class="line">30</div><div class="line">31</div><div class="line">32</div><div class="line">33</div><div class="line">34</div><div class="line">35</div><div class="line">36</div><div class="line">37</div><div class="line">38</div><div class="line">39</div><div class="line">40</div><div class="line">41</div><div class="line">42</div><div class="line">43</div><div class="line">44</div><div class="line">45</div><div class="line">46</div><div class="line">47</div><div class="line">48</div></pre></td><td class="code"><pre><div class="line"></div><div class="line">files:</div><div class="line">  <span class="string">"/tmp/deployment/config/#etc#nginx#conf.d#00_elastic_beanstalk_proxy.conf"</span> :</div><div class="line">    mode: <span class="string">"000755"</span></div><div class="line">    owner: root</div><div class="line">    group: root</div><div class="line">    content: |</div><div class="line">        upstream nodejs {</div><div class="line">        	server <span class="number">127.0</span>.<span class="number">0.1</span>:<span class="number">8081</span>;</div><div class="line">        	keepalive <span class="number">256</span>;</div><div class="line">        }</div><div class="line"></div><div class="line">        server {</div><div class="line">            listen <span class="number">8080</span>;</div><div class="line"></div><div class="line">            <span class="keyword">set</span> <span class="variable">$fixedWWW</span> <span class="string">''</span>;</div><div class="line">            <span class="keyword">set</span> <span class="variable">$needRedir</span> <span class="number">0</span>;</div><div class="line"></div><div class="line">            <span class="comment"># nginx does not allow nested if statements</span></div><div class="line"></div><div class="line">            <span class="comment"># check and decide on adding www prefix</span></div><div class="line">            <span class="keyword">if</span> (<span class="variable">$host</span> !~* ^www(.*)) {</div><div class="line">	         	  <span class="keyword">set</span> <span class="variable">$fixedWWW</span> <span class="string">'www.'</span>;</div><div class="line">	            <span class="keyword">set</span> <span class="variable">$needRedir</span> <span class="number">1</span>;</div><div class="line">            }</div><div class="line"></div><div class="line">            <span class="comment"># what about that https? the traffic is all http right now</span></div><div class="line">            <span class="comment"># but elastic load balancer tells us about the original scheme</span></div><div class="line">            <span class="comment"># using $http_x_forwarded_proto variable</span></div><div class="line">            <span class="keyword">if</span> (<span class="variable">$http_x_forwarded_proto</span> != <span class="string">'https'</span>) {</div><div class="line">	             <span class="keyword">set</span> <span class="variable">$needRedir</span> <span class="number">1</span>;</div><div class="line">            }</div><div class="line"></div><div class="line">            <span class="comment"># ok, so whats the verdict, do we need to redirect?</span></div><div class="line">            <span class="keyword">if</span> (<span class="variable">$needRedir</span> = <span class="number">1</span>) {</div><div class="line">                rewrite ^(.*) https://<span class="variable">$fixedWWW</span><span class="variable">$host</span><span class="variable">$1</span> redirect;</div><div class="line">            }</div><div class="line"></div><div class="line">            location / {</div><div class="line">                proxy_pass  http://nodejs;</div><div class="line">                proxy_<span class="keyword">set</span>_header   Connection <span class="string">""</span>;</div><div class="line">                proxy_http_version <span class="number">1.1</span>;</div><div class="line">                proxy_<span class="keyword">set</span>_header        Host            <span class="variable">$host</span>;</div><div class="line">                proxy_<span class="keyword">set</span>_header        X-Real-IP       <span class="variable">$remote_addr</span>;</div><div class="line">                proxy_<span class="keyword">set</span>_header        X-Forwarded-For <span class="variable">$proxy_add_x_forwarded_for</span>;</div><div class="line">            }</div><div class="line">            gzip on;</div><div class="line">        }</div></pre></td></tr></table></figure>


]]></content>
    <summary type="html">
    <![CDATA[<p>We are running most of our backend code at <a href="https://www.dishero.com" target="_blank" rel="external">Dishero</a> on Amazon Elastic]]>
    </summary>
    
      <category term="amazon" scheme="http://finik.net/tags/amazon/"/>
    
      <category term="aws" scheme="http://finik.net/tags/aws/"/>
    
      <category term="elastic beanstalk" scheme="http://finik.net/tags/elastic-beanstalk/"/>
    
      <category term="nginx" scheme="http://finik.net/tags/nginx/"/>
    
  </entry>
  
  <entry>
    <title><![CDATA[hexo]]></title>
    <link href="http://finik.net/2014/10/29/hexo/"/>
    <id>http://finik.net/2014/10/29/hexo/</id>
    <published>2014-10-29T08:13:23.000Z</published>
    <updated>2014-10-30T05:29:06.000Z</updated>
    <content type="html"><![CDATA[<p>Spent the evening setting up a new blog engine as I couldn’t revive the old one. This whole Ruby/Gem/Bundle mess is beyond me, it just never works. So this blog is now running on hexo. I am sure that won’t make me write more, but its Node.JS/NPM based, so at least I will be able to set it up again on a new machine if I suddenly do decide to.</p>
<p>What was it I wanted to blog about? I really can’t remember.</p>
]]></content>
    <summary type="html">
    <![CDATA[<p>Spent the evening setting up a new blog engine as I couldn’t revive the old one. This whole Ruby/Gem/Bundle mess is beyond me, it just ne]]>
    </summary>
    
      <category term="blog" scheme="http://finik.net/tags/blog/"/>
    
      <category term="hexo" scheme="http://finik.net/tags/hexo/"/>
    
  </entry>
  
  <entry>
    <title><![CDATA[Google Reader]]></title>
    <link href="http://finik.net/2013/03/24/google-reader/"/>
    <id>http://finik.net/2013/03/24/google-reader/</id>
    <published>2013-03-25T00:41:00.000Z</published>
    <updated>2014-10-30T09:01:14.000Z</updated>
    <content type="html"><![CDATA[<p>Since Google has shut down the Reader I keep reading in various sources the same idea over and over again. The idea that RSS is an old technology, that it was and is used only by geeks, and that it is obsolete and not needed anymore as one is supposed to get his fix of news through social media (facebook, twitter) and social reading apps like zite, flipboard, etc.</p>
<p>What bothers me most is I read these same ideas in blogs of pretty technical people whose opinions I do usually value.</p>
<p>The interesting part is, if it wasn’t for the RSS, I wouldn’t be reading these blogs in the first place, as it would be too much of a hassle for me to visit each one of their individual sites to check whether they generated some new content. I am also not going to subscribe to their facebook or twitter feeds for the occasional notifications, as it has too much noise for my taste, I don’t care for their random 140 letter ideas, nor do I care about photos of their dinner, I only want their well structured thoughts, the ones they actually spent some time on. So if RSS dies tomorrow, chances are I will still visit some of these sites, but the frequency will become significantly lower with time, and eventually I might even forget about some of them, or give up on regularly reading blogs altogether.</p>
<p>I do agree that social media and tablet/iphone magazines do solve the problem of getting news, latest internet memes etc. I do use Flipboard, Facebook and Twitter myself. But these are things that will eventually pop up in one of these social feeds one way or another anyway, if I miss the post from site A then I will notice a repost from site B the next day or a week later. And even if I do miss some, who cares, knowing it doesn’t really bother me.</p>
<p>But what about personal blogs? I know John Doe, I know he is writing about a topic that is close to my heart, I want to read absolutely everything he writes and I want to read it the day he writes it because I like to be part of the discussion as well. I also like to read everything in one place and I want to be able to save reading some of these articles for later. Is there any technology besides RSS today that fits all these requirements?</p>
<p>I will happily admit RSS is dead if you can point me in the direction of that alternative technology. I don’t think you can though.</p>
]]></content>
    <summary type="html">
    <![CDATA[<p>Since Google has shut down the Reader I keep reading in various sources the same idea over and over again. The idea that RSS is an old te]]>
    </summary>
    
      <category term="rss" scheme="http://finik.net/tags/rss/"/>
    
      <category term="google" scheme="http://finik.net/tags/google/"/>
    
      <category term="blog" scheme="http://finik.net/tags/blog/"/>
    
  </entry>
  
  <entry>
    <title><![CDATA[Hello, Octopress!]]></title>
    <link href="http://finik.net/2012/12/19/hello-octopress/"/>
    <id>http://finik.net/2012/12/19/hello-octopress/</id>
    <published>2012-12-20T06:08:00.000Z</published>
    <updated>2014-10-30T05:17:43.000Z</updated>
    <content type="html"><![CDATA[<p>I finally gave in to peer pressure and switched my blog to Octopress.</p>
<p>Apparently WordPress is not cool anymore and all the kids forgot php, uninstalled mysql, went back to generating static pages and just outsource all comment management headache to <a href="http://disqus.com" target="_blank" rel="external">Disqus</a>.</p>
<p>In the process if migration I decided I didn’t really have any important posts or comments I had to move over from the old blog (which was mostly a mirror of my old LiveJournal account anyway), so I just left all of them behind and starting from a clean sheet here.</p>
<p>Well, I actually did move <a href="/blog/2010/10/24/multiple-working-folders-with-single-git-repository">one</a> post, the only technical post I had there, and since the plan for this new blog to be fairly technical, I decided it will be a good start.</p>
<p>Wish me luck and lets hope I will actually write.</p>
]]></content>
    <summary type="html">
    <![CDATA[<p>I finally gave in to peer pressure and switched my blog to Octopress.</p>
<p>Apparently WordPress is not cool anymore and all the kids fo]]>
    </summary>
    
      <category term="blog" scheme="http://finik.net/tags/blog/"/>
    
      <category term="octopress" scheme="http://finik.net/tags/octopress/"/>
    
  </entry>
  
  <entry>
    <title><![CDATA[Multiple working folders with single GIT repository]]></title>
    <link href="http://finik.net/2010/10/24/multiple-working-folders-with-single-git-repository/"/>
    <id>http://finik.net/2010/10/24/multiple-working-folders-with-single-git-repository/</id>
    <published>2010-10-24T20:52:00.000Z</published>
    <updated>2014-10-30T09:01:14.000Z</updated>
    <content type="html"><![CDATA[<h2 id="The_problem">The problem</h2>
<p>As much as I love GIT, there are several design decisions that make my everyday work really difficult. One of such design flaws is making the repository and the working folder tightly coupled. It is a serious problem for every developer who is frequently switching between several product/topic branches of the same project.</p>
<p>Git gives you two options to deal with this:</p>
<ul>
<li>Create different local clones of the repository and checkout different branch in every one of them.</li>
<li>Do all your work in one local repository, every time you have a task switch ether stash or commit your changes on the current branch and checkout a different one.</li>
</ul>
<p>As I quickly learned both solutions were not very practical for what I was doing. As a linux kernel developer in a company that actually ships multiple linux based products, I eventually found myself working and supporting several product branches, sometimes based on different versions of the kernel. One branch could be plain vanilla kernel.org kernel based on 2.6.32, another one could be an old product running of 2.6.24 with tons of additional architecture specific code that came from a vendor, etc. Both approaches had very serious drawbacks:</p>
<ul>
<li>Cloning a kernel repository for each product/branch would take more disk space (every copy of kernel repository is about 500MB), even though disk space is cheap today, you have to admit it doesn’t make sense to keep several copies of the same binary blob on your disk (UPDATE 10/25/2010: That is actually not true, cloning locally from the existing repository is done via hard links, so no extra space is wasted). But the biggest problem is synchronizing all these local repositories. If I need to merge branches or cherry-pick individual commits between them I end up pushing and pulling the changes through a shared remote repository, or connecting these local repositories as remotes to one another.</li>
<li>Doing all your work in one repository is not an option either, if you ever tried to checkout a 2.6.24 linux kernel branch while already having 2.6.35 in your folder you’d understand why, it takes time. When you are multi-tasking you usually try to minimize the overhead of each switch and having to stash your current work or create dummy commits every time you switch doesn’t seem like the right way to do it. Another drawback to this approach is there is no convenient way to do a nice visual diff between files and folders on two branches, yes, it’s doable, but it is not as easy as running “meld folderA folderB”.</li>
</ul>
<h2 id="The_solution">The solution</h2>
<p>I’m not going to take credit for the method I am going to show you, I wasn’t the one who came up with it, Ed, one of the guys on my team did. Ed actually developed whole set of useful scripts for kernel development involving frequent switching between product branching, but the part about branching and multiple working folders is applicable to other projects as well, so that’s what I want to share with you.<br>Actually the trick is quite trivial, we use our knowledge of git internals and unix symbolic links to achieve what we want. All we wanted is to have one repository and multiple working folders associated with it, so lets do just that. That is how our final folder structure will look like:</p>
<pre><code>project
+-.repo
  +-.git
    +-branches
    +-config
    +-description
    +-HEAD
    +-hooks
    +-objects
    +-info
    +-packed-refs
    +-refs
+-branchA
  +-.git
    +-branches<span class="function"> -&gt;</span> ..<span class="regexp">/../</span>.repo/.git/branches
    +-config<span class="function"> -&gt;</span> ..<span class="regexp">/../</span>.repo/config
    +-description
    +-HEAD
    +-index
    +-hooks<span class="function"> -&gt;</span> ..<span class="regexp">/../</span>.repo/hooks
    +-objects<span class="function"> -&gt;</span> ..<span class="regexp">/../</span>.repo/objects
    +-info<span class="function"> -&gt;</span> ..<span class="regexp">/../</span>.repo/info
    +-packed-refs<span class="function"> -&gt;</span> ..<span class="regexp">/../</span>.repo/packed-refs
    +-refs<span class="function"> -&gt;</span> ..<span class="regexp">/../</span>.repo/refs
+-branchB
+-branchC
...
etc
</code></pre><p>We created one wrapper “project” folder, one master GIT repository in .repo and a bunch of branchX folders. Each one of these folders is a legal GIT folder by itself, however it doesn’t keep its own config and objects/refs repositories, it links to the one in .repo instead. It does keep a private local version of HEAD, index (staging area) and the whole working folder. Every manipulation on the database performed in any of the branch folders is immediately visible in others (commits, branches, tags, remote changes), context switching is just a matter of changing folders now.</p>
<p>This is how we initialize this structure for the first time time:</p>
<figure class="highlight bash"><figcaption><span>init.sh</span></figcaption><table><tr><td class="gutter"><pre><div class="line">1</div><div class="line">2</div><div class="line">3</div><div class="line">4</div><div class="line">5</div><div class="line">6</div><div class="line">7</div><div class="line">8</div><div class="line">9</div><div class="line">10</div><div class="line">11</div><div class="line">12</div><div class="line">13</div><div class="line">14</div><div class="line">15</div><div class="line">16</div><div class="line">17</div><div class="line">18</div></pre></td><td class="code"><pre><div class="line">mkdir .repo</div><div class="line"><span class="built_in">pushd</span> .repo</div><div class="line"></div><div class="line">git init</div><div class="line">git remote add origin git://some.remote.url.../project.git</div><div class="line">git fetch origin</div><div class="line"></div><div class="line"><span class="built_in">popd</span></div><div class="line"></div><div class="line">newfolder.sh branchA</div><div class="line"><span class="built_in">pushd</span> branchA</div><div class="line">git checkout -b branchA origin/branchA</div><div class="line"><span class="built_in">popd</span></div><div class="line"></div><div class="line">newfolder.sh branchB</div><div class="line"><span class="built_in">pushd</span> branchB</div><div class="line">git checkout -b branchB origin/branchB</div><div class="line"><span class="built_in">popd</span></div></pre></td></tr></table></figure>

<p>The script we used to automate creation of a new working folder (newfolder.sh). We can call it as many times as we want an whenever we need to create a new folder.</p>
<figure class="highlight bash"><figcaption><span>newfolder.sh</span></figcaption><table><tr><td class="gutter"><pre><div class="line">1</div><div class="line">2</div><div class="line">3</div><div class="line">4</div><div class="line">5</div><div class="line">6</div><div class="line">7</div><div class="line">8</div><div class="line">9</div><div class="line">10</div><div class="line">11</div><div class="line">12</div><div class="line">13</div><div class="line">14</div><div class="line">15</div><div class="line">16</div><div class="line">17</div><div class="line">18</div><div class="line">19</div><div class="line">20</div></pre></td><td class="code"><pre><div class="line"><span class="keyword">if</span> [ <span class="string">"<span class="variable">$1</span>"</span> == <span class="string">""</span> ]; <span class="keyword">then</span></div><div class="line">	<span class="built_in">echo</span> <span class="string">"Need to specify target."</span></div><div class="line">	<span class="keyword">return</span></div><div class="line"><span class="keyword">fi</span></div><div class="line"></div><div class="line">TARGET=<span class="variable">$1</span></div><div class="line">mkdir <span class="variable">$TARGET</span></div><div class="line"><span class="built_in">pushd</span> <span class="variable">$TARGET</span></div><div class="line"></div><div class="line">git init</div><div class="line"></div><div class="line"><span class="built_in">pushd</span> .git</div><div class="line"></div><div class="line"><span class="keyword">for</span> i <span class="keyword">in</span> branches config hooks info objects refs packed-refs ; <span class="keyword">do</span></div><div class="line">	rm -rf <span class="variable">$i</span></div><div class="line">	ln -sf ../../.repo/.git/<span class="variable">$i</span> <span class="variable">$i</span></div><div class="line"><span class="keyword">done</span></div><div class="line"></div><div class="line"><span class="built_in">popd</span> <span class="comment"># .git</span></div><div class="line"><span class="built_in">popd</span> <span class="comment"># $TARGET</span></div></pre></td></tr></table></figure>

<p>Enjoy! I find this method very useful already, but I’ll be glad to hear some feedback since I am sure someone will come up with a way to polish it and make it even better.</p>
<p><strong>Update 10/25/01</strong>: I wrote the post yesterday, and today I accidentally found out that the trick described above for a while has been a part of a standard git distribution and can be found in contrib/workdir/git-new-workdir :)</p>
]]></content>
    <summary type="html">
    <![CDATA[<h2 id="The_problem">The problem</h2>
<p>As much as I love GIT, there are several design decisions that make my everyday work really difficu]]>
    </summary>
    
      <category term="git" scheme="http://finik.net/tags/git/"/>
    
      <category term="build" scheme="http://finik.net/tags/build/"/>
    
      <category term="kernel" scheme="http://finik.net/tags/kernel/"/>
    
  </entry>
  
</feed>