In this post I continue the analysis of Auzzle, the magnetic puzzle invented by Ilya Osipov and attempt to come up with a simple to remember solution involving only one algorithm. See my first post for the background and initial analysis.
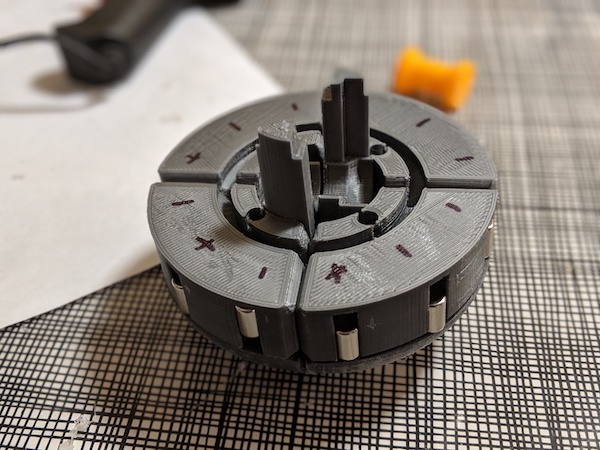
After practically living for three days at my friend’s house and learning more than I ever wanted to know about 3d printing, I’ve finally got myself an Auzzle to play with. The picture below shows the assembly process:
The goal
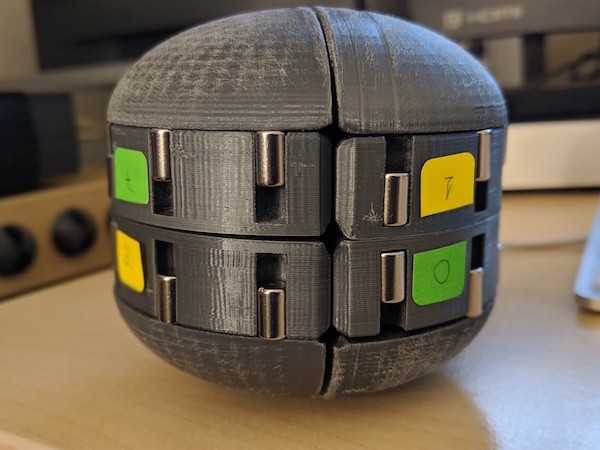
There are four pairs, or 8 pieces total in the puzzle. The goal is to move them around until we get to one of the combinations (there are multiple) where each pair is aligned vertically. In the picture below, piece #1 should be matched with #3 and #0 with #7, so swapping two pieces either on the top layer or the bottom one would solve both pairs. Obviously on a real Auzzle the pieces are not marked with colors or stickers, so our solution should not assume that, instead we need to deduce it just by looking at the magnets formations.
Notation
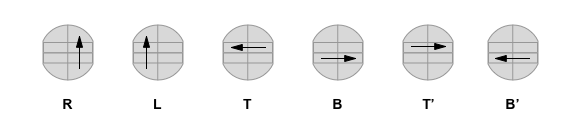
Lets try to adopt a common notation usually used in Rubik’s cube. The difference is our R and L in Auzzle always rotate by full 180 degrees, so we won’t need R’ and L’, as they are identical to R and L.
Magic algorithm
As I’ve shown in my previous post, it is always possible to get to one of the solved state within 10 moves (in fact most cases can be solved within 5-7 moves), however our goal here is different, what we would like is to come up with one basic, intuitive and easy to remember algorithm, which, when applied properly, would help us solve the puzzle. There are multiple ways to go about it, but here one of them:
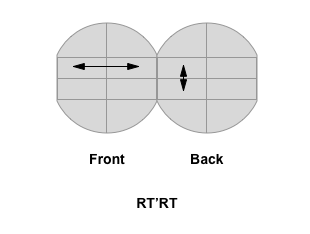
What does it do? It just swaps top left and top right pieces on the front. There is a side effect, top and bottom pieces on the right back are being swapped too. Left back is being left completely untouched. Which means, if we have some pieces already paired, keeping them in the back and performing the algorithm will not mess up their pairing, and we pretty much can ignore the side effect.
Phase 1: Getting to one pair
We don’t really need any algorithm for this. We will just rotate the top (T) and will likely get at least one pair matched, if we don’t, after making a full circle, we rotate right side (R) and then rotate (T) again, we WILL eventually get some pairs matched.
If we are really lucky and we got all 4 matched, the puzzle is solved. If we got two pairs matched, we skip to phase 3. Otherwise we need to get us a second pair first.
Phase 2: Getting the second pair
Remember how we said our magic algorithm doesn’t really mess up anything in the back? So we can put our matched pair in the back left or right quadrant and try performing the algorithm to swap pieces at the front, until we get our second pair matched. The problem is, it won’t always work :) In order to explain why, I will use 4 different colors, as before, to represent 4 different matching pairs. Auzzle with one matched pair generally falls within one of the two cases above:
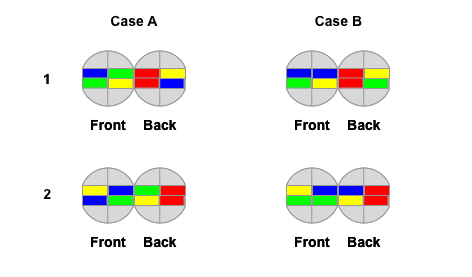
Note: If you look closely, A1 and A2 is actually the same case, just rotated 90 degrees. Similarly B2 is just a rotated B1.
Case A: This is the easy one, for each unsolved pair, one piece is located on the top and one on the bottom. It doesn’t matter where we put our first matched (red) pair, as long as it is on the back it will remain untouched. But the moment we perform our magic algorithm, second pair (either green or blue) is going to get matched.
Case B: Here matching pieces are colocated on the same top or bottom planes. Which means performing the magic algorithm will not result in any new pairs being created.
How can we know whether we are in case A or B? That is actually easy, we can rotate the top layer one click right (T’) or left (T). If another pair (our green or blue ones) is getting matched, we are in case A, otherwise we are in case B.
Phase 3: Last two pairs
Ok, we got 2 pairs matched, just bring them both to the back, and lets work with the unmatched pieces at the front. There are two ways how 2 pairs can be potentially unmatched (see diagram below). On a real Auzzle we obviously won’t see green and red segment colors like in the diagram below, but we can see the magnets interaction and infer the case we are dealing with:
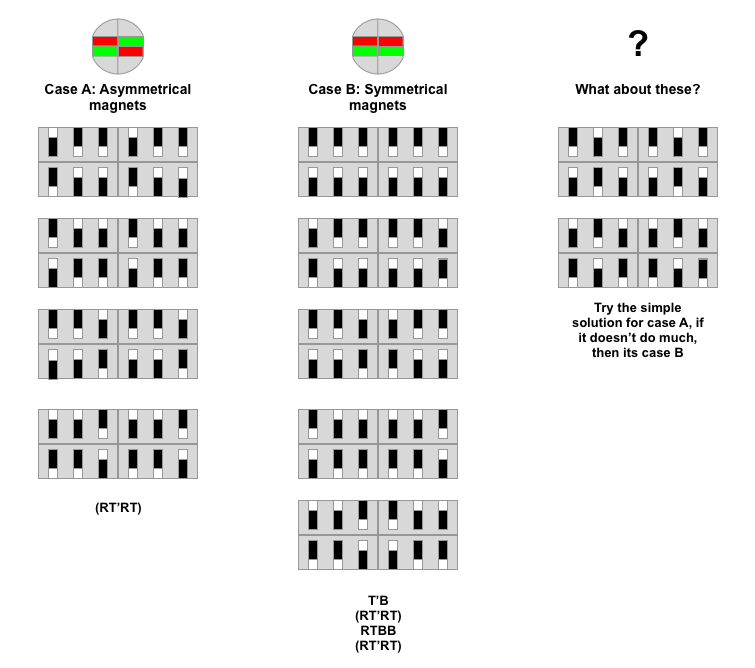
Case A: The easiest one is when we notice an asymmetrical configuration of the magents. The pieces are crossed! We can just perform our magic algorithm to swap to top left and right pieces and the puzzle is solved!
Case B: This one is a bit trickier. The left and the right side are clearly symmetrical. That tells us the pieces are not crossed. Swapping two top ones will not help us much, we will end up exactly where we started. We need to break the “parity” of the puzzle and get to the Case A we love so much.
There are also two magnet configuration which don’t tell us whether we are in A or B. How can we know? Lets try to rotate top layer (T’). If the this is case A (crossed), we will immediately see the pair matched, we are in Case A, rotate the top layer back (T) and perform the magic algorithm. Otherwise we are in Case B.
In fact, if you would rather not think at all about Case A or Case B and dont' care about few extra twists, you can always try to perform the algorithm for A, and if the puzzle is not solved continue to B (i.e
I am sure there are more effective ways to solve the puzzle with less (5-7) moves, even just memorizing and using all the mirror variations of our magic algorithm above would make a huge difference and save tons of unnecessary moves. Phase 2 should be improved too. It’s a start, stay tuned for updates.